Connect Site
Publishing Platform
Unsure? Chat to us on support or email [email protected]
Not sure how to connect? We can host your blog for you — free.
Add one DNS record, and we handle everything — your expert articles go live automatically and start bringing you customers from AI and Google.
- Articles published and hosted for you automatically
- Simple setup — no plugins, no code, no technical skills needed
- Included with your plan at no extra cost
What's your WordPress website URL?
We'll verify that WordPress is running on your site
You can enter with or without https://
WordPress Not Detected
Things to check:
- Make sure you entered the correct URL
- Check that your site is publicly accessible
- Verify WordPress is installed (not in maintenance mode)
Install the AutoSEO Plugin
We'll take you to your WordPress plugin page. Install AutoSEO from there.
WordPress Detected!
Here's what you'll see:
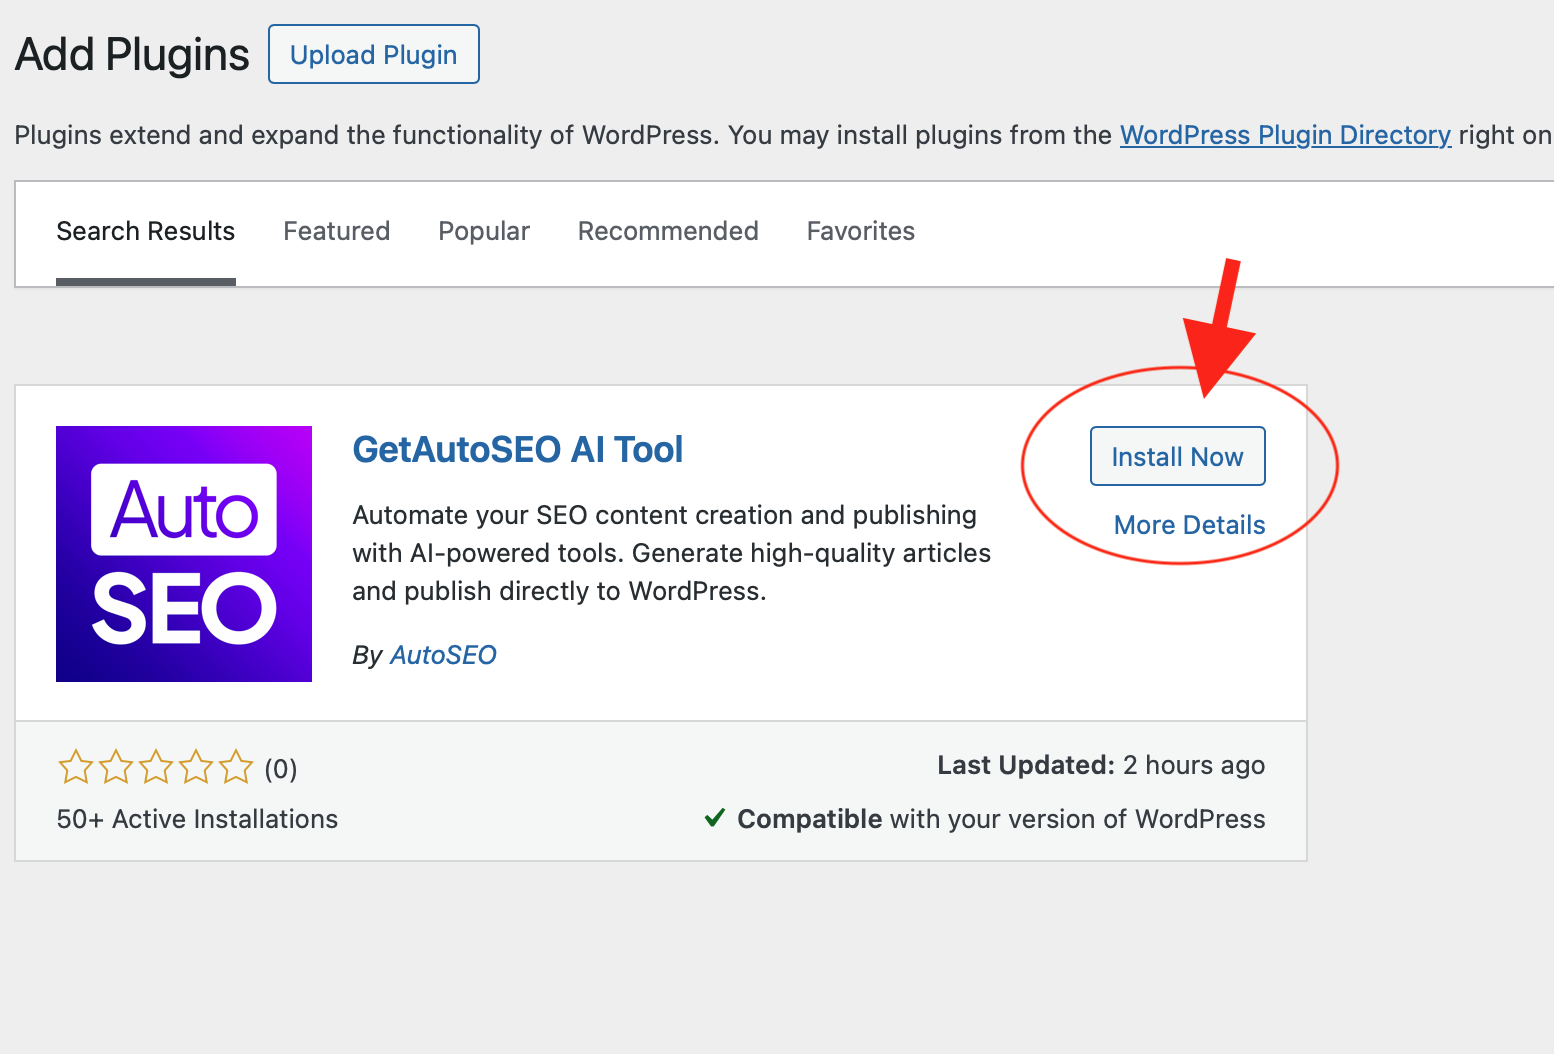
The AutoSEO plugin in your WordPress plugin search results
After clicking the button below:
- 1 Find "AutoSEO - AI Content Publisher" in the search results
- 2 Click "Install Now" then "Activate"
- 3 Come back here for your API key
Connecting to Your WordPress Site...
We're verifying the plugin installation automatically.
Tip: Make sure you've activated the AutoSEO plugin in WordPress.
Connected Successfully!
Your WordPress site is now linked to AutoSEO. No API key needed!
Your articles will automatically publish to your WordPress site.
Enter Your API Key
Auto-connect wasn't available. Copy your API key to the plugin settings.
Keep this key secure. You can regenerate it anytime from the Integrations page.
In your WordPress admin:
- 1 Go to AutoSEO in your WordPress sidebar (or click the setup notice)
- 2 Paste your API key in the "API Key" field
- 3 Click "Complete Setup" - you're all set!
Webflow CMS
Connect your Webflow site to publish articles directly to your CMS collections
Connect with API Token
Generate a token in your Webflow site settings and paste it below. Takes about 2 minutes.
How to get your API token
Follow these steps in your Webflow dashboard. Click any image to enlarge.
Open your site settings
Go to webflow.com/dashboard, find your site, and click the Settings (gear) icon.
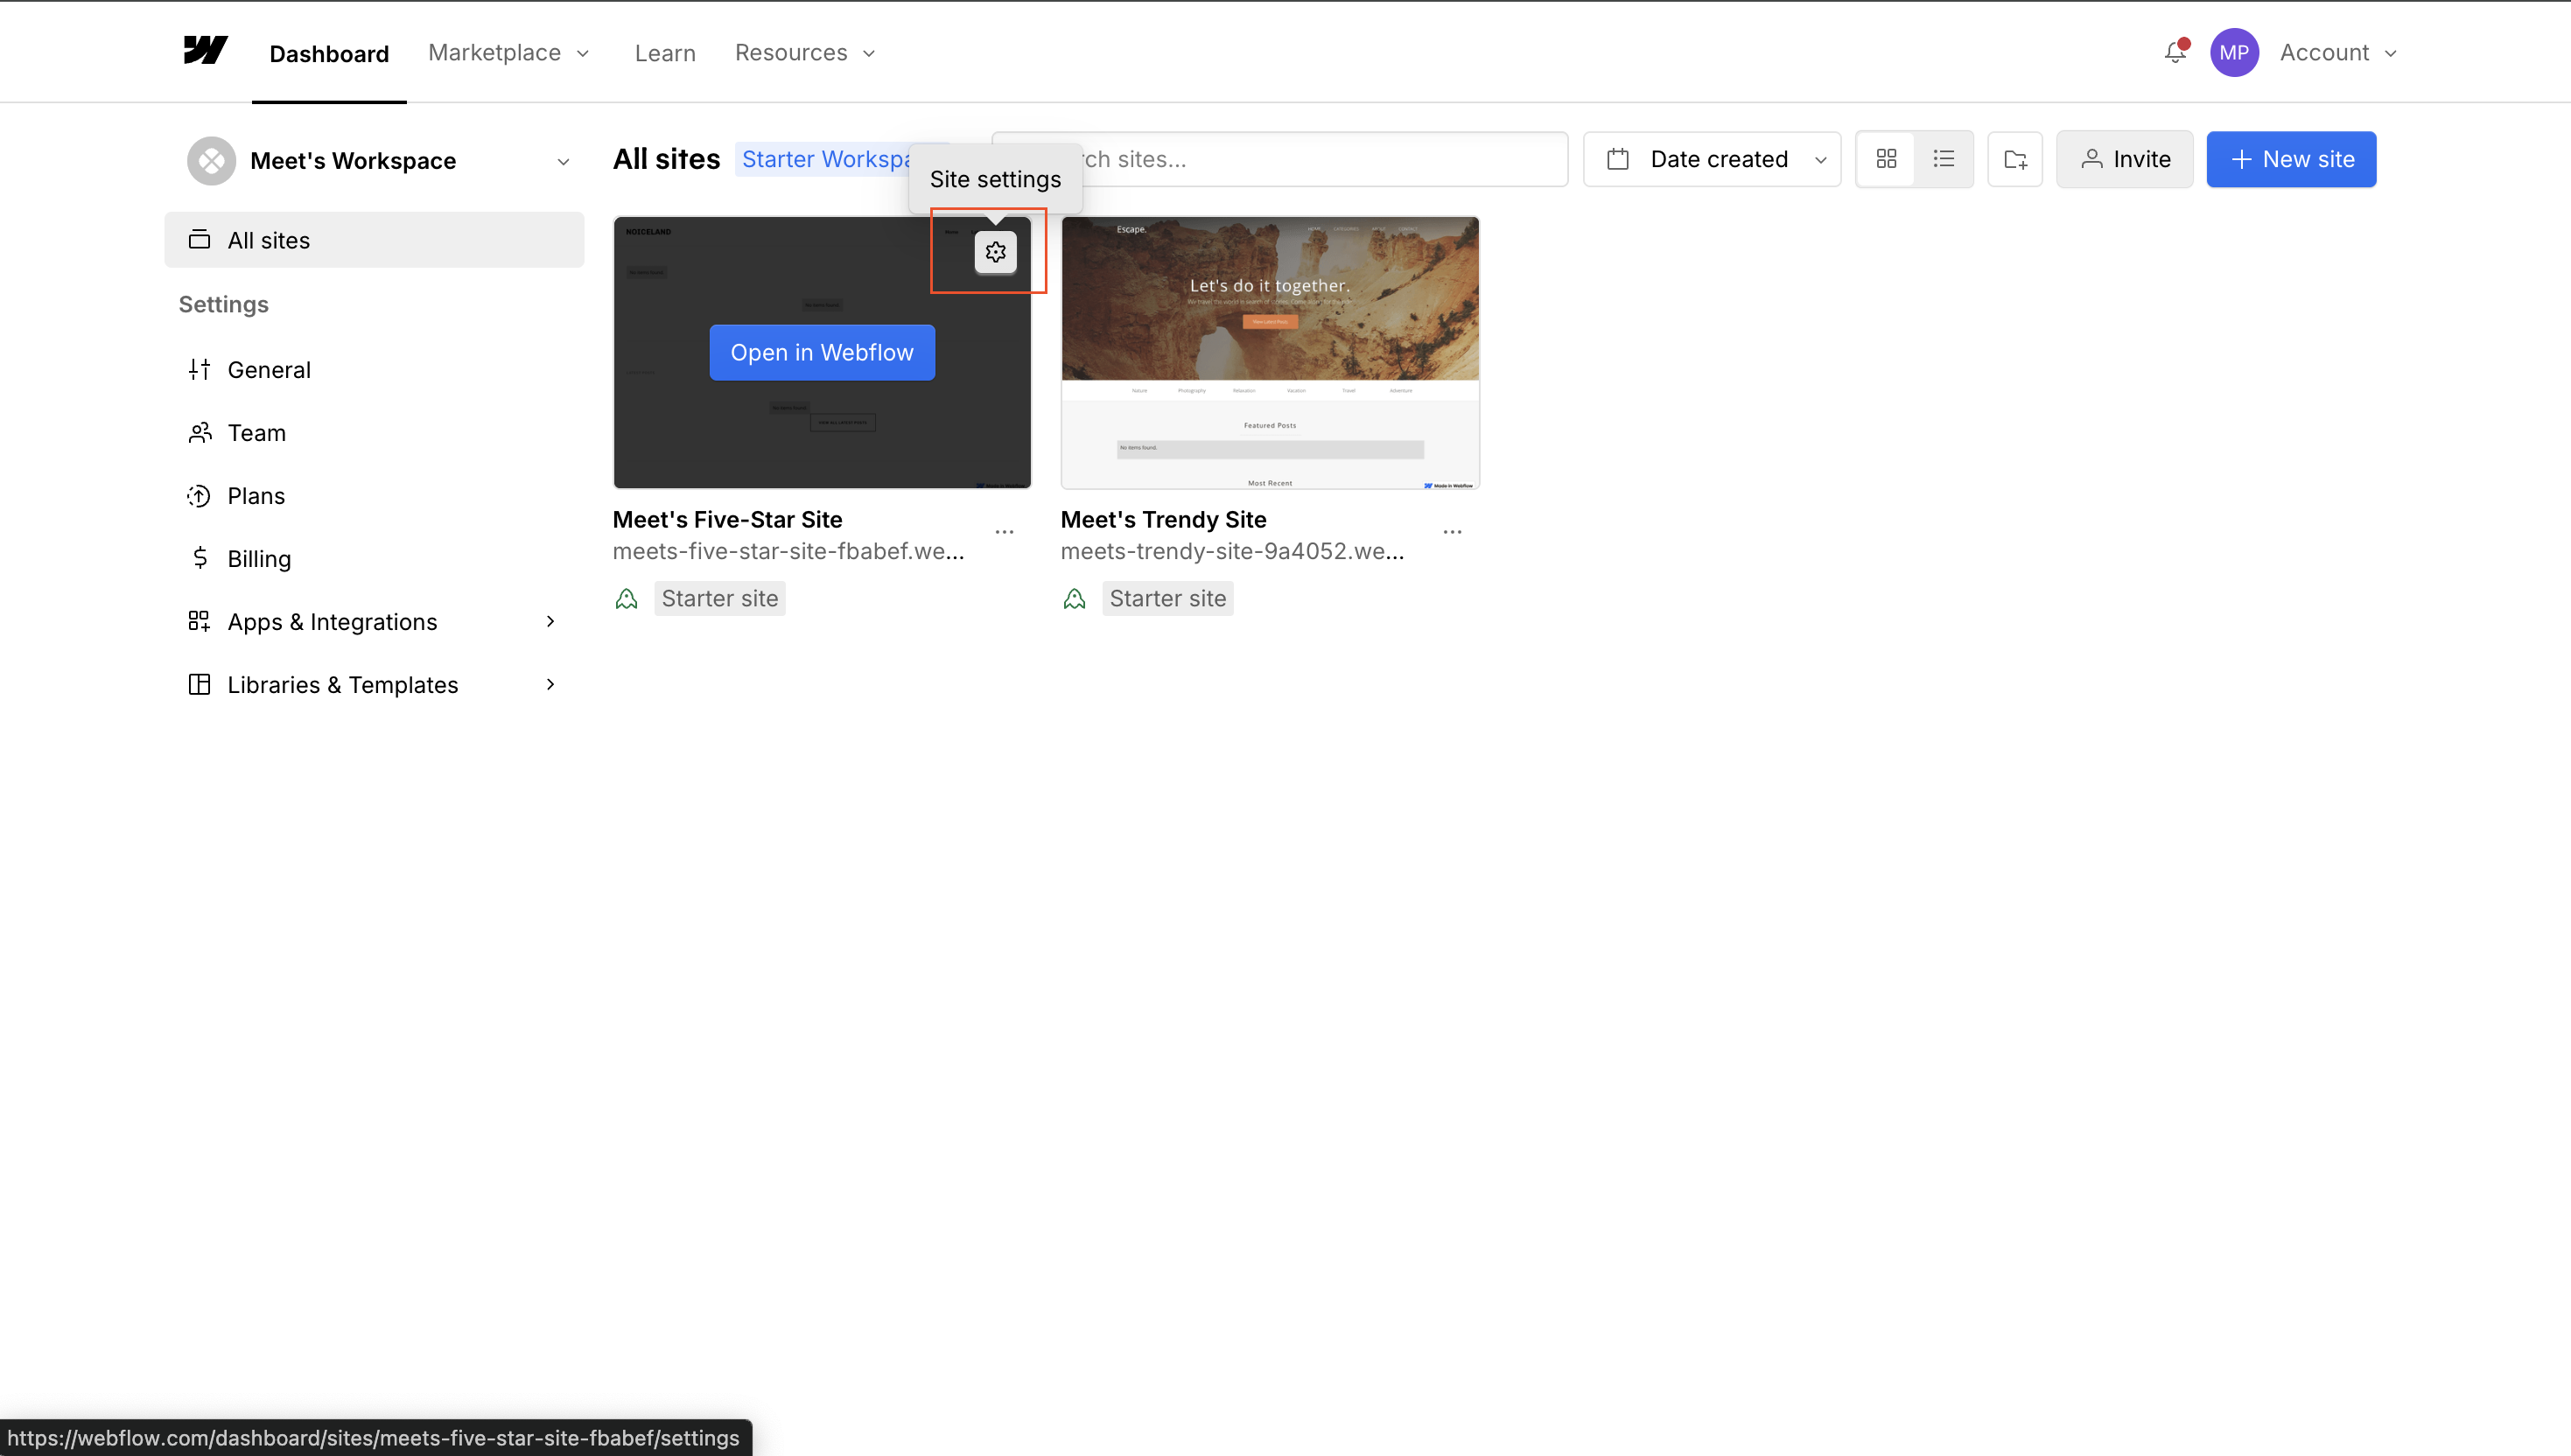
Go to Apps & Integrations
In the left sidebar, click Apps & Integrations.
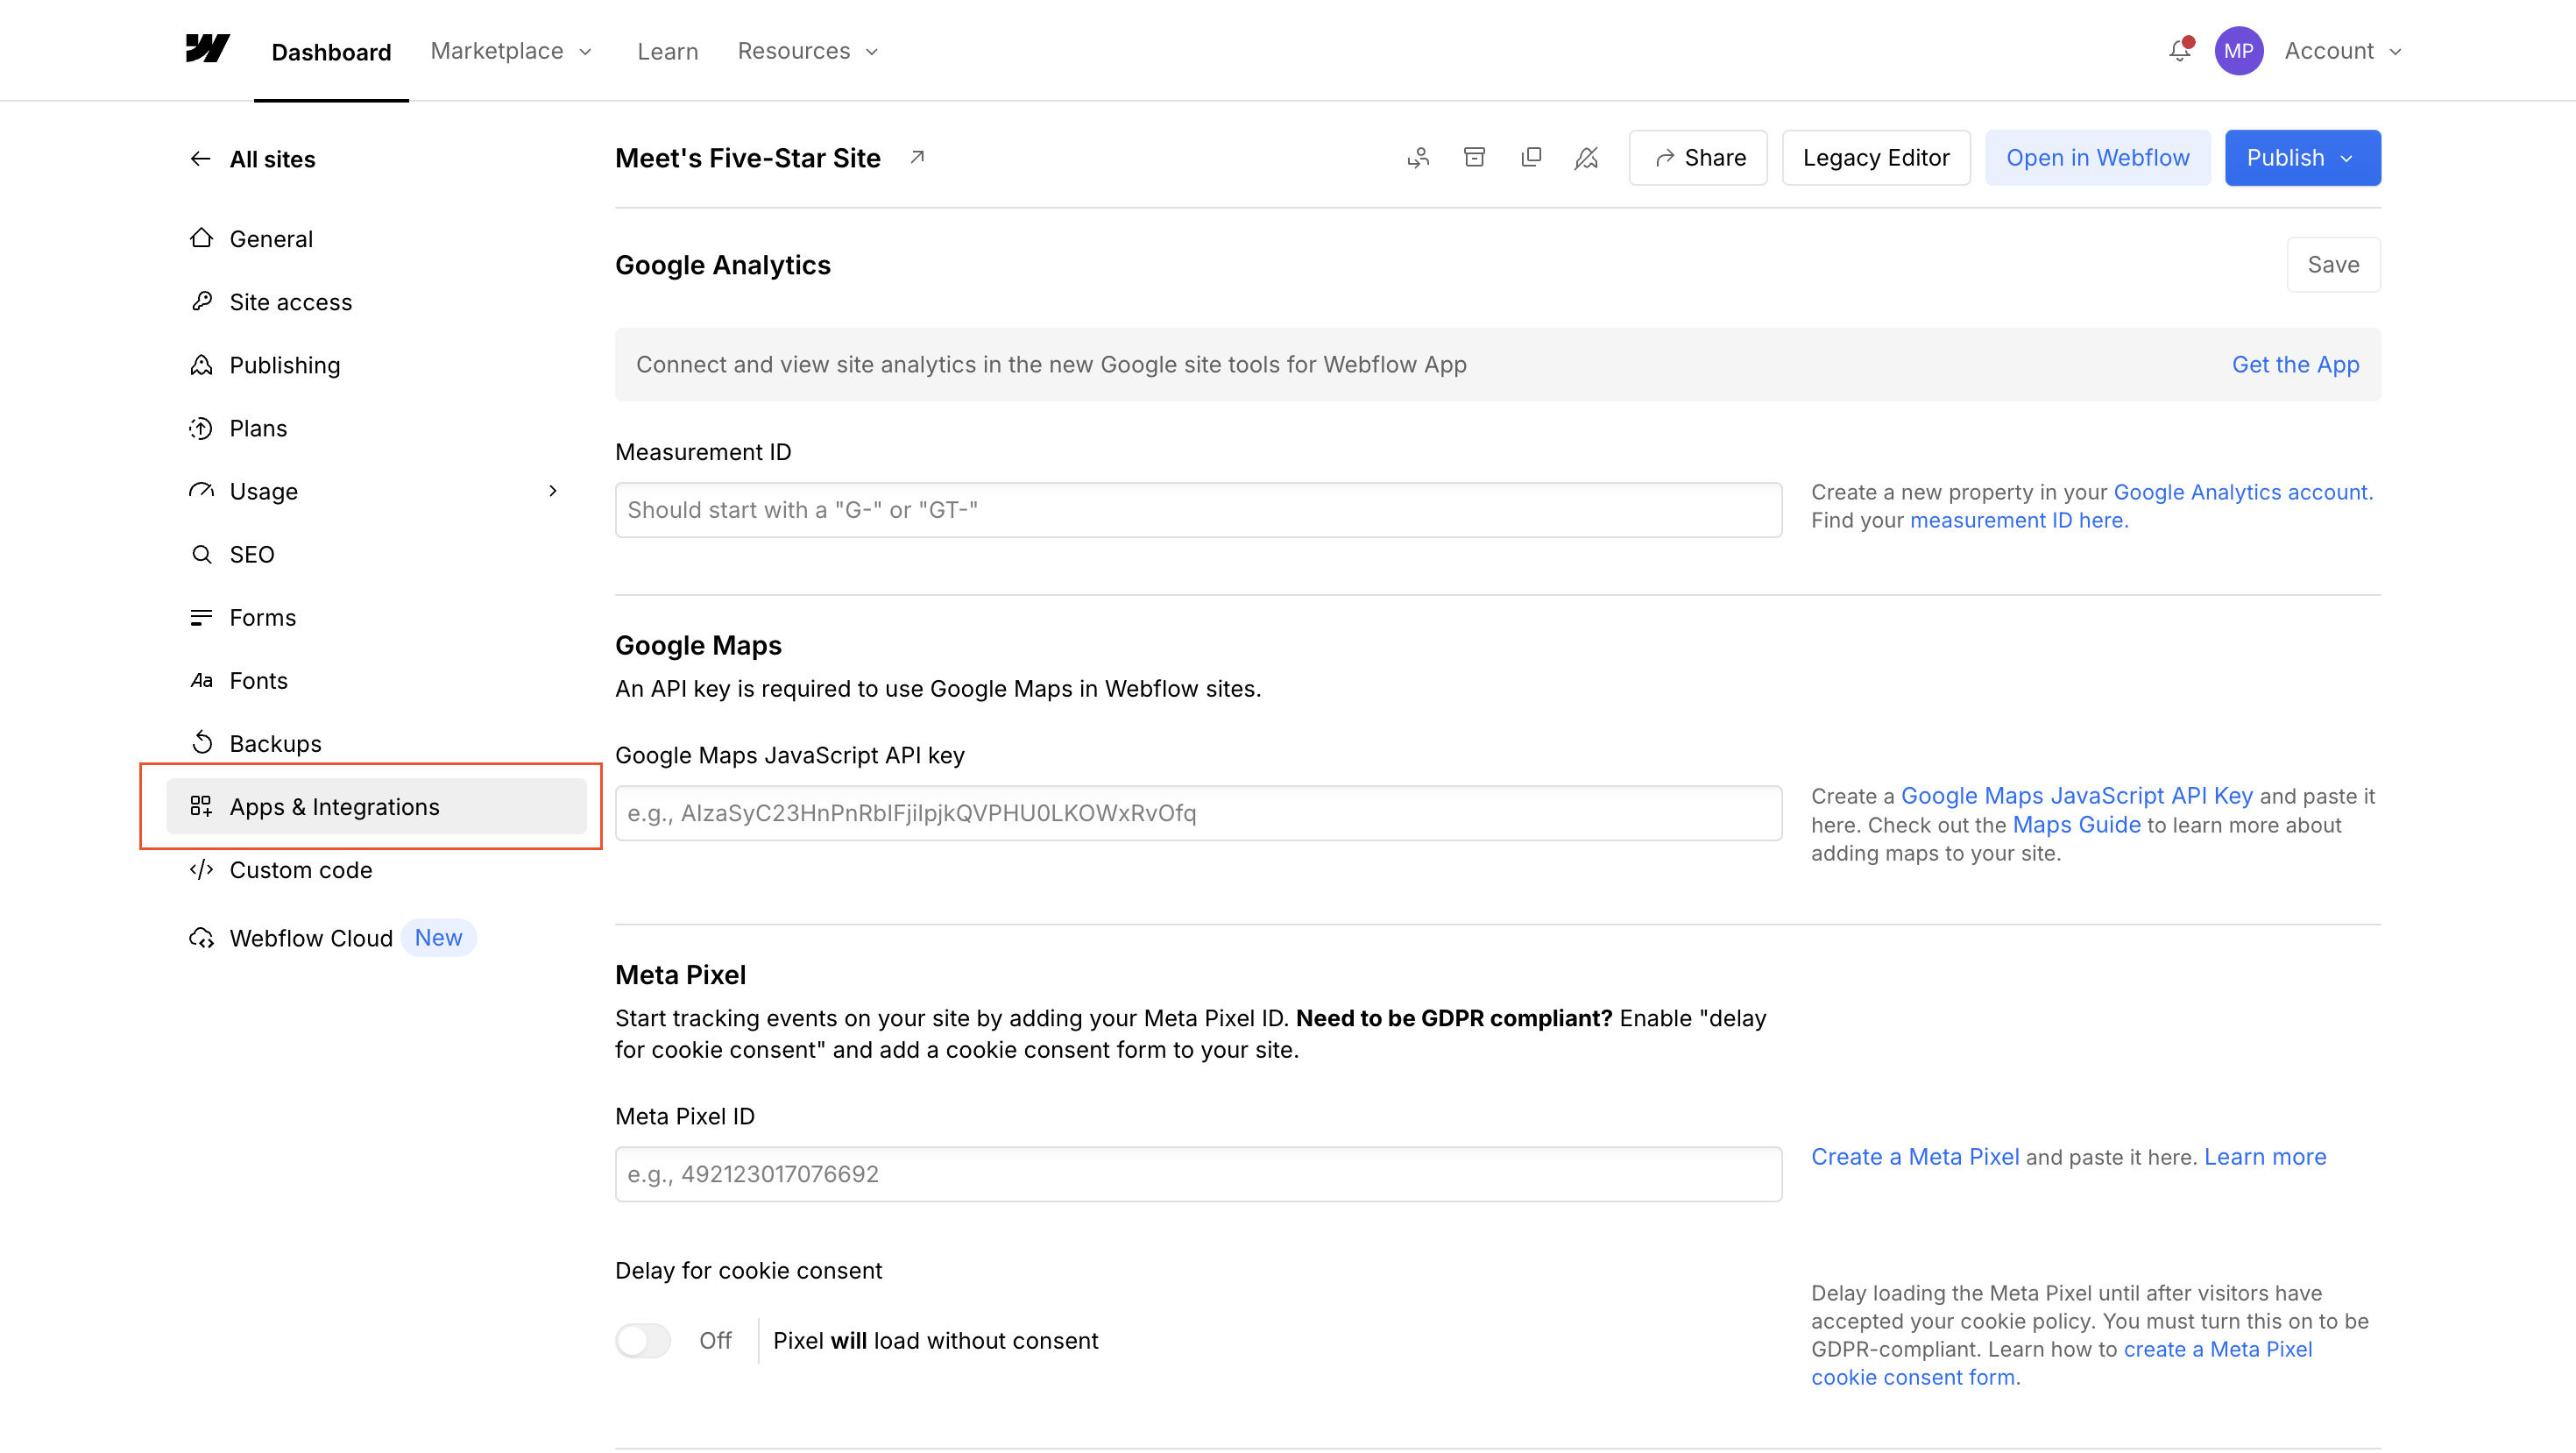
Generate API Token
Scroll down to the API access section and click Generate API token.
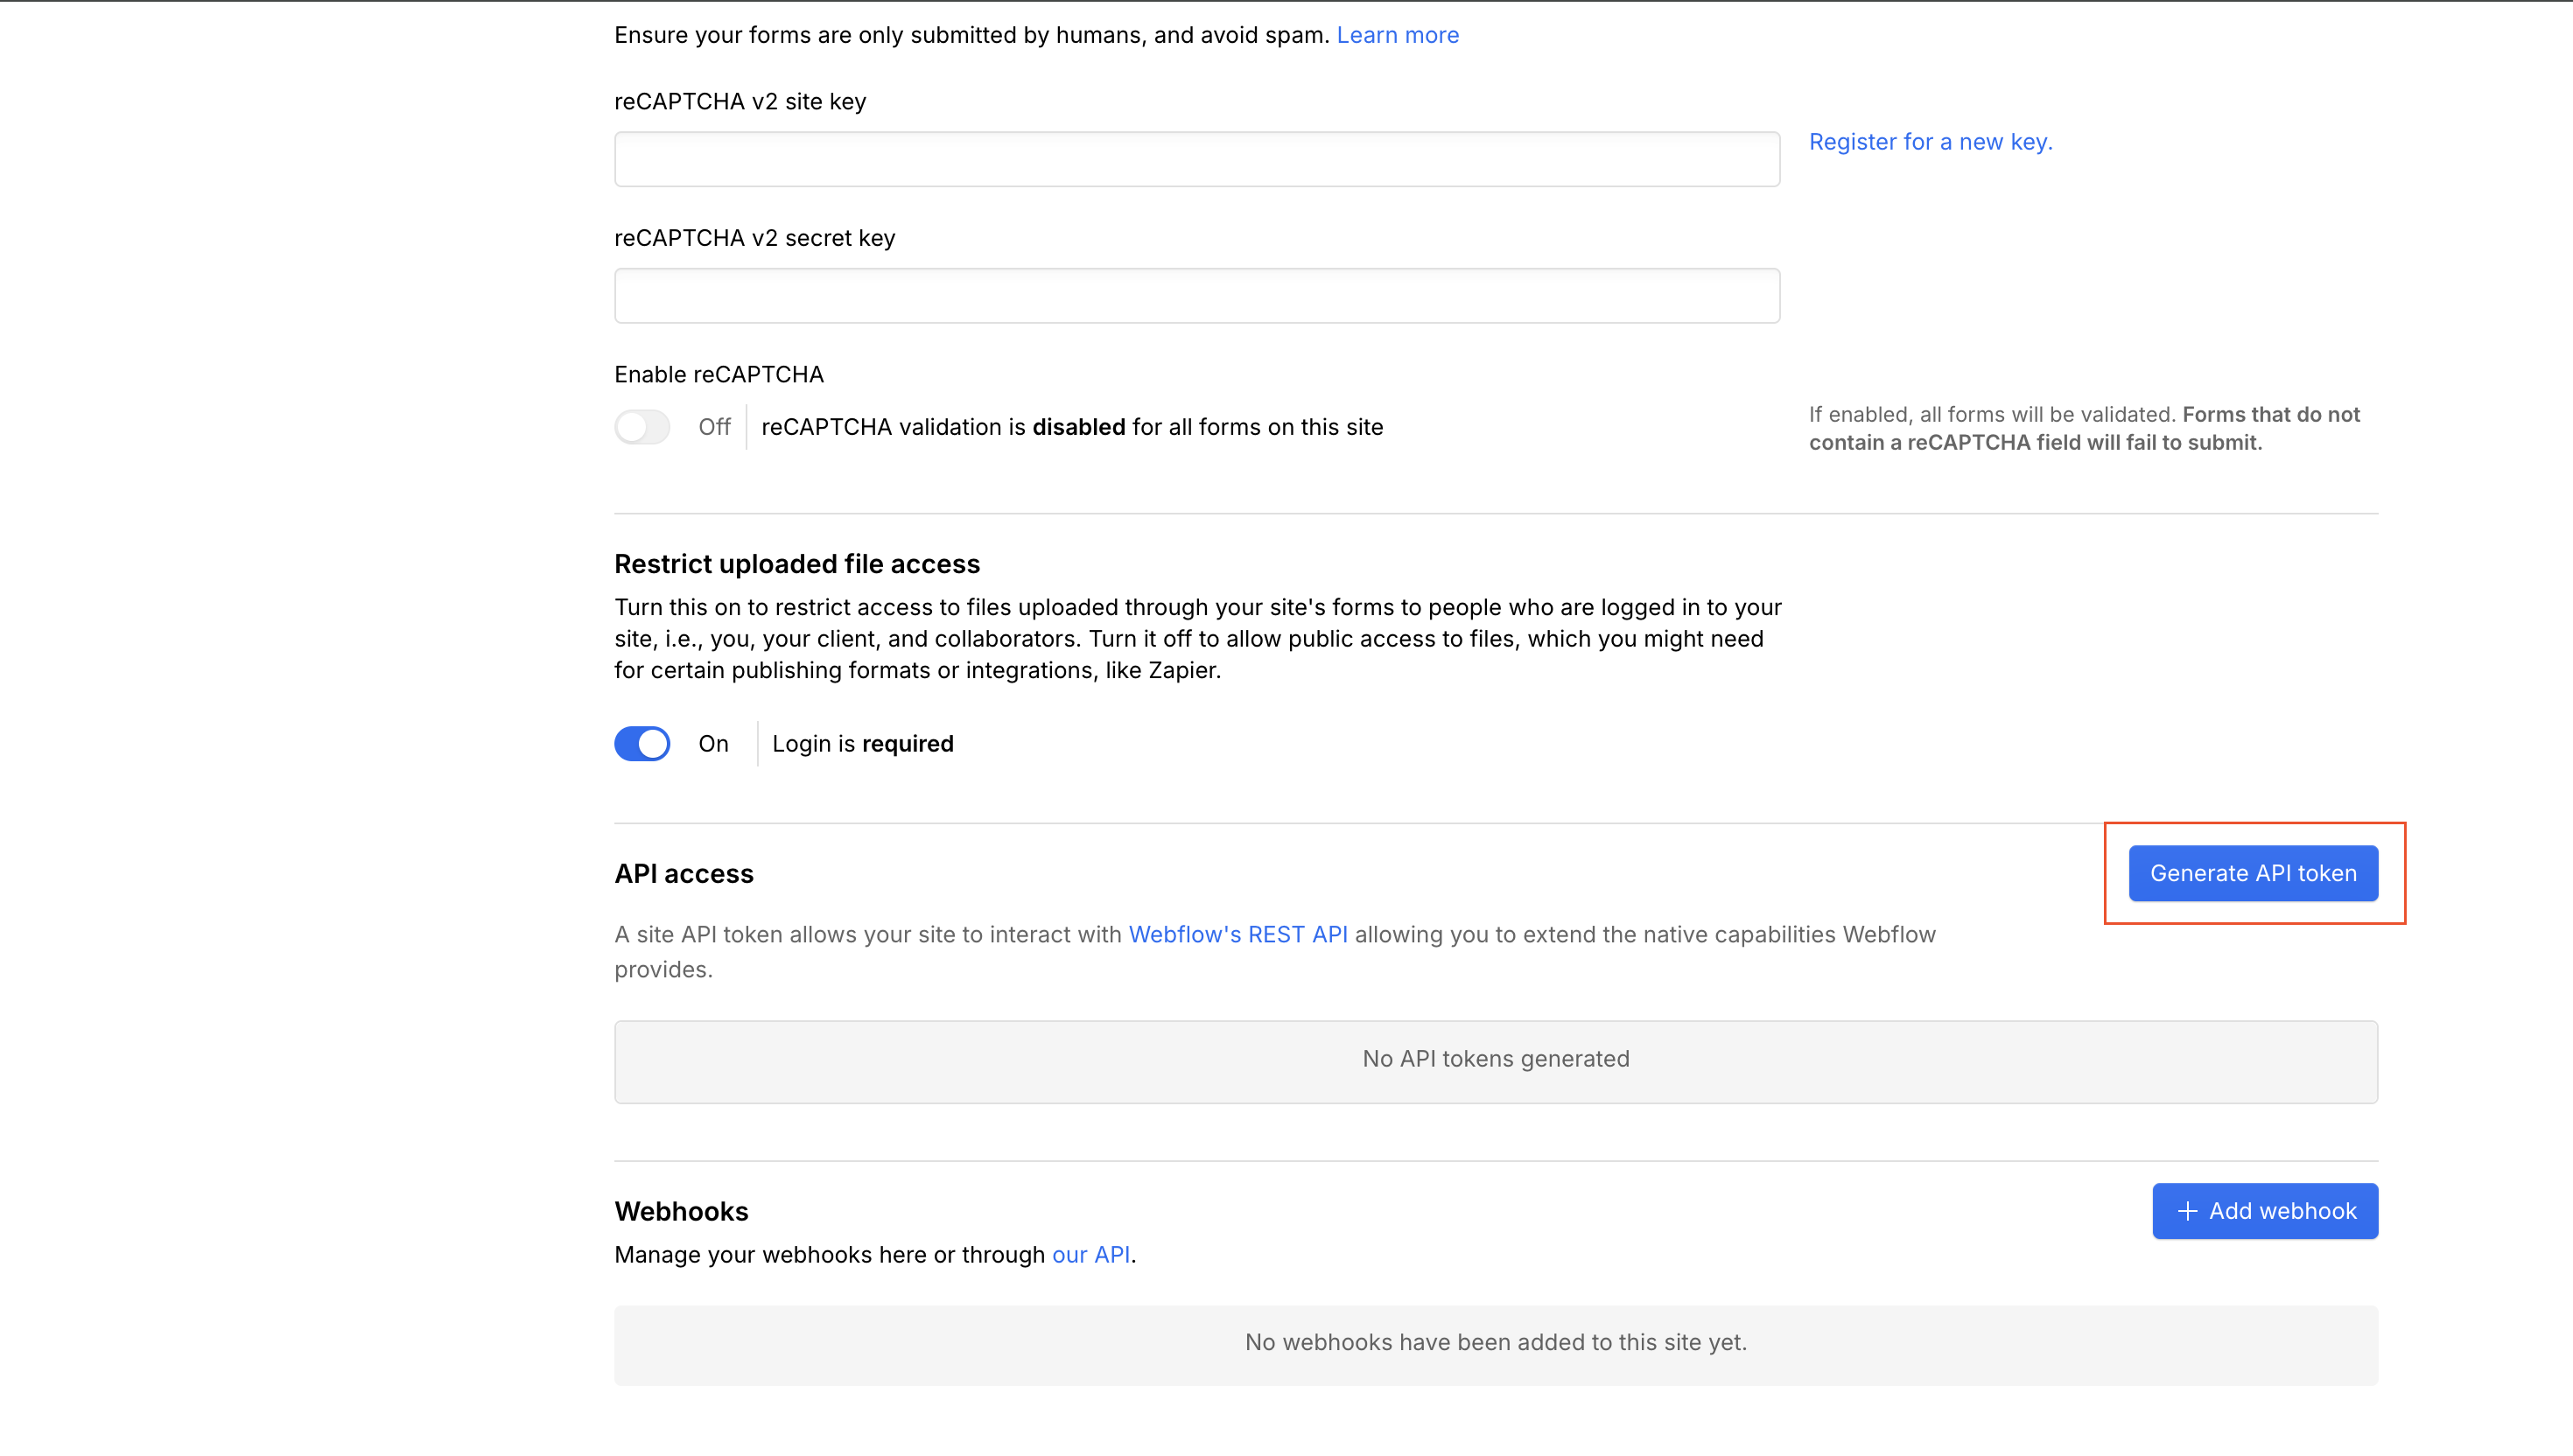
Set permissions: Sites → Read and Write
In the permissions dialog, set Sites to Read and write.

Set permissions: CMS → Read and Write
Also set CMS to Read and write. This lets us publish articles to your collections.
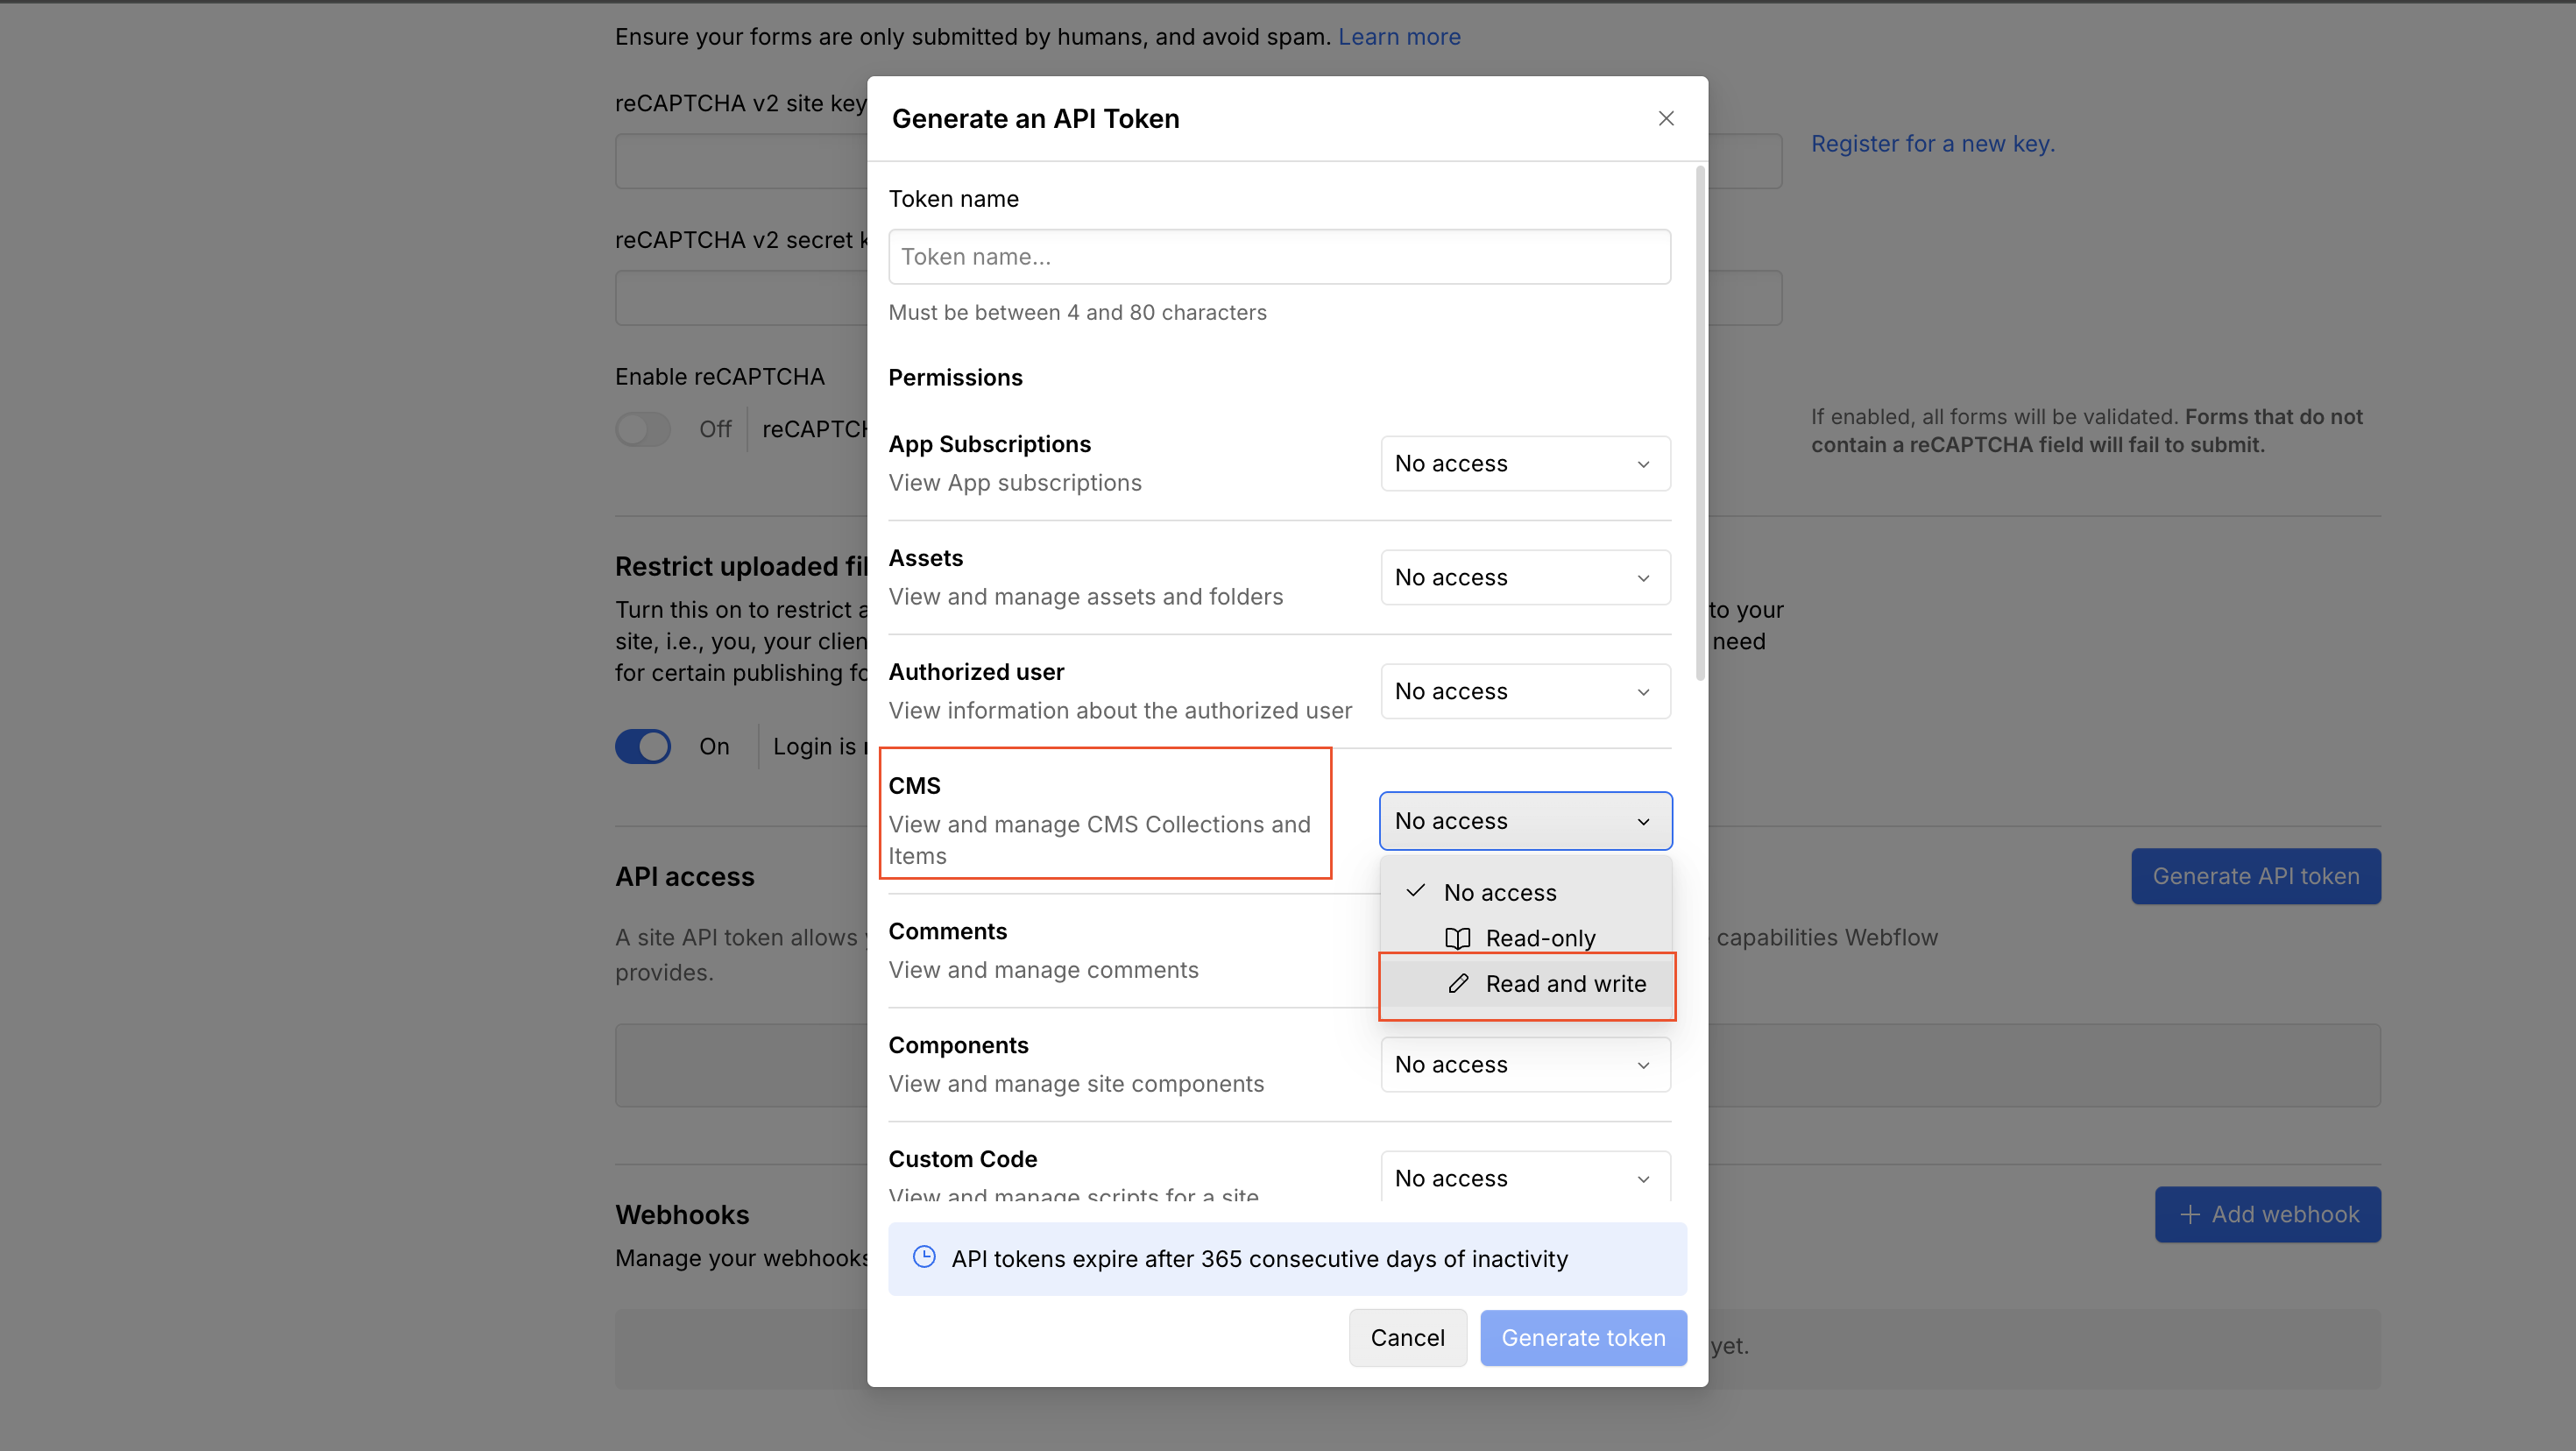
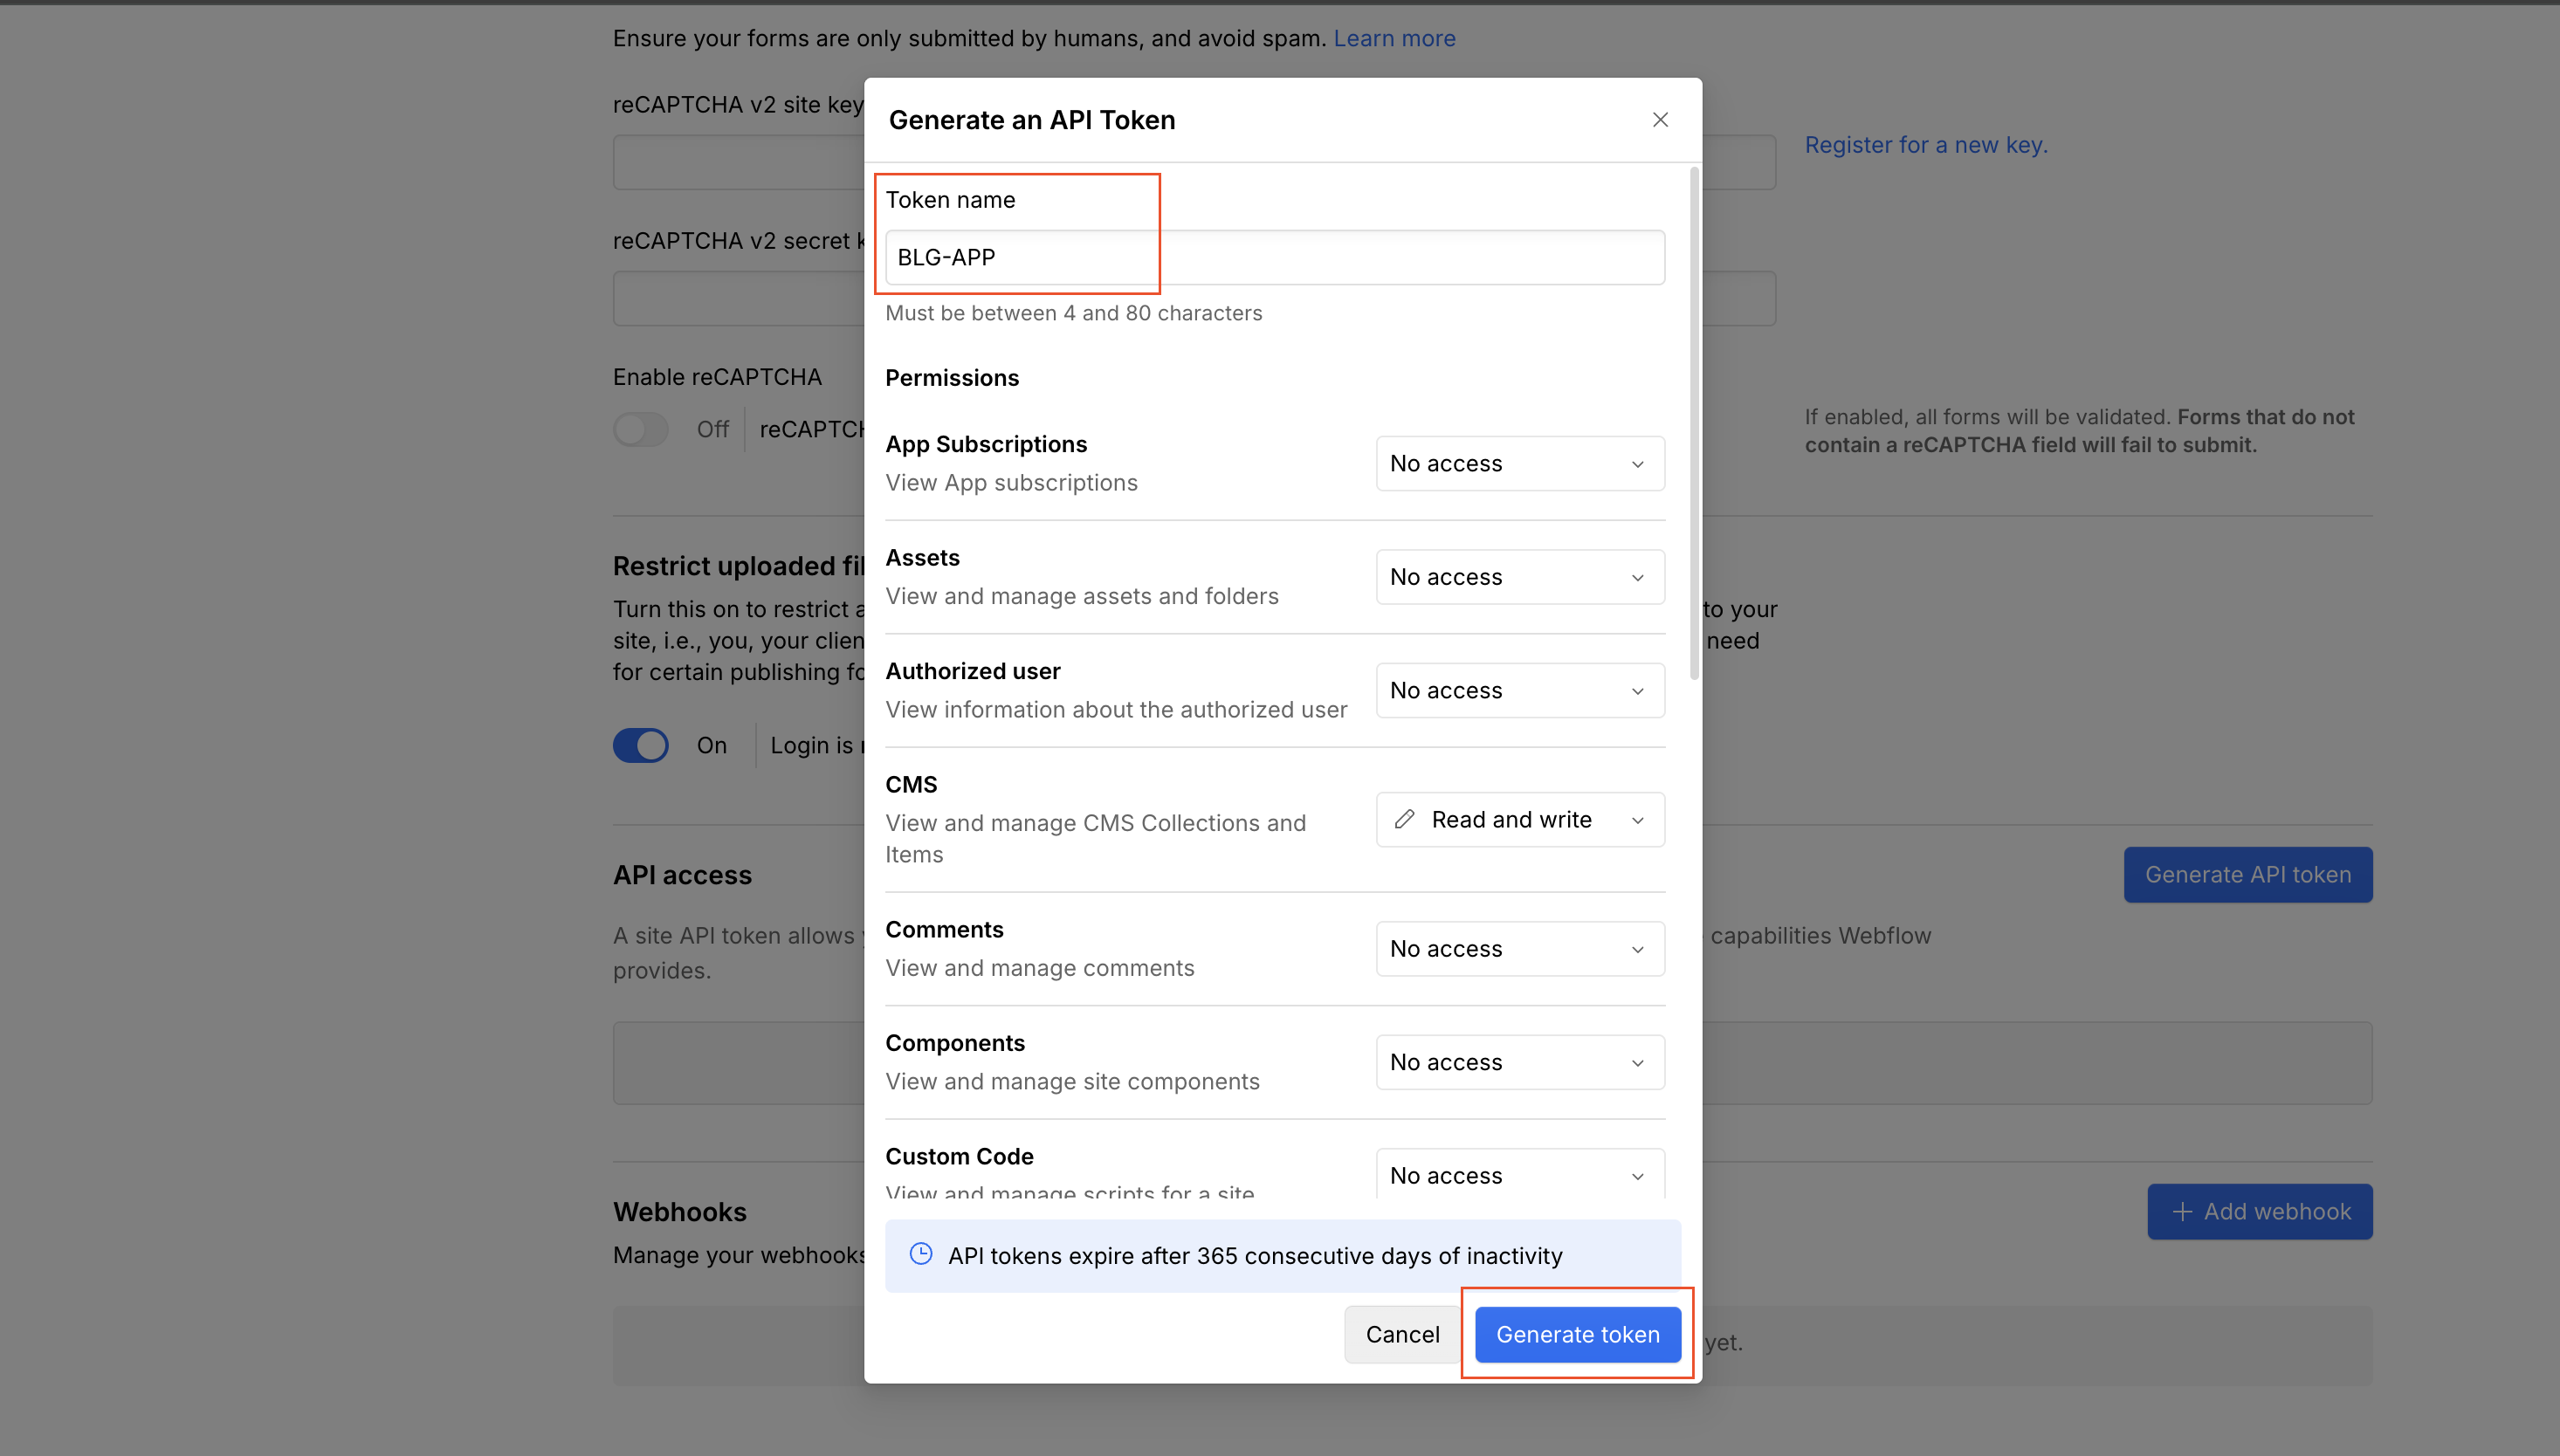
Name your token and generate
Give it any name (e.g. "AutoSEO"), confirm CMS is set to Read and write, then click Generate token.
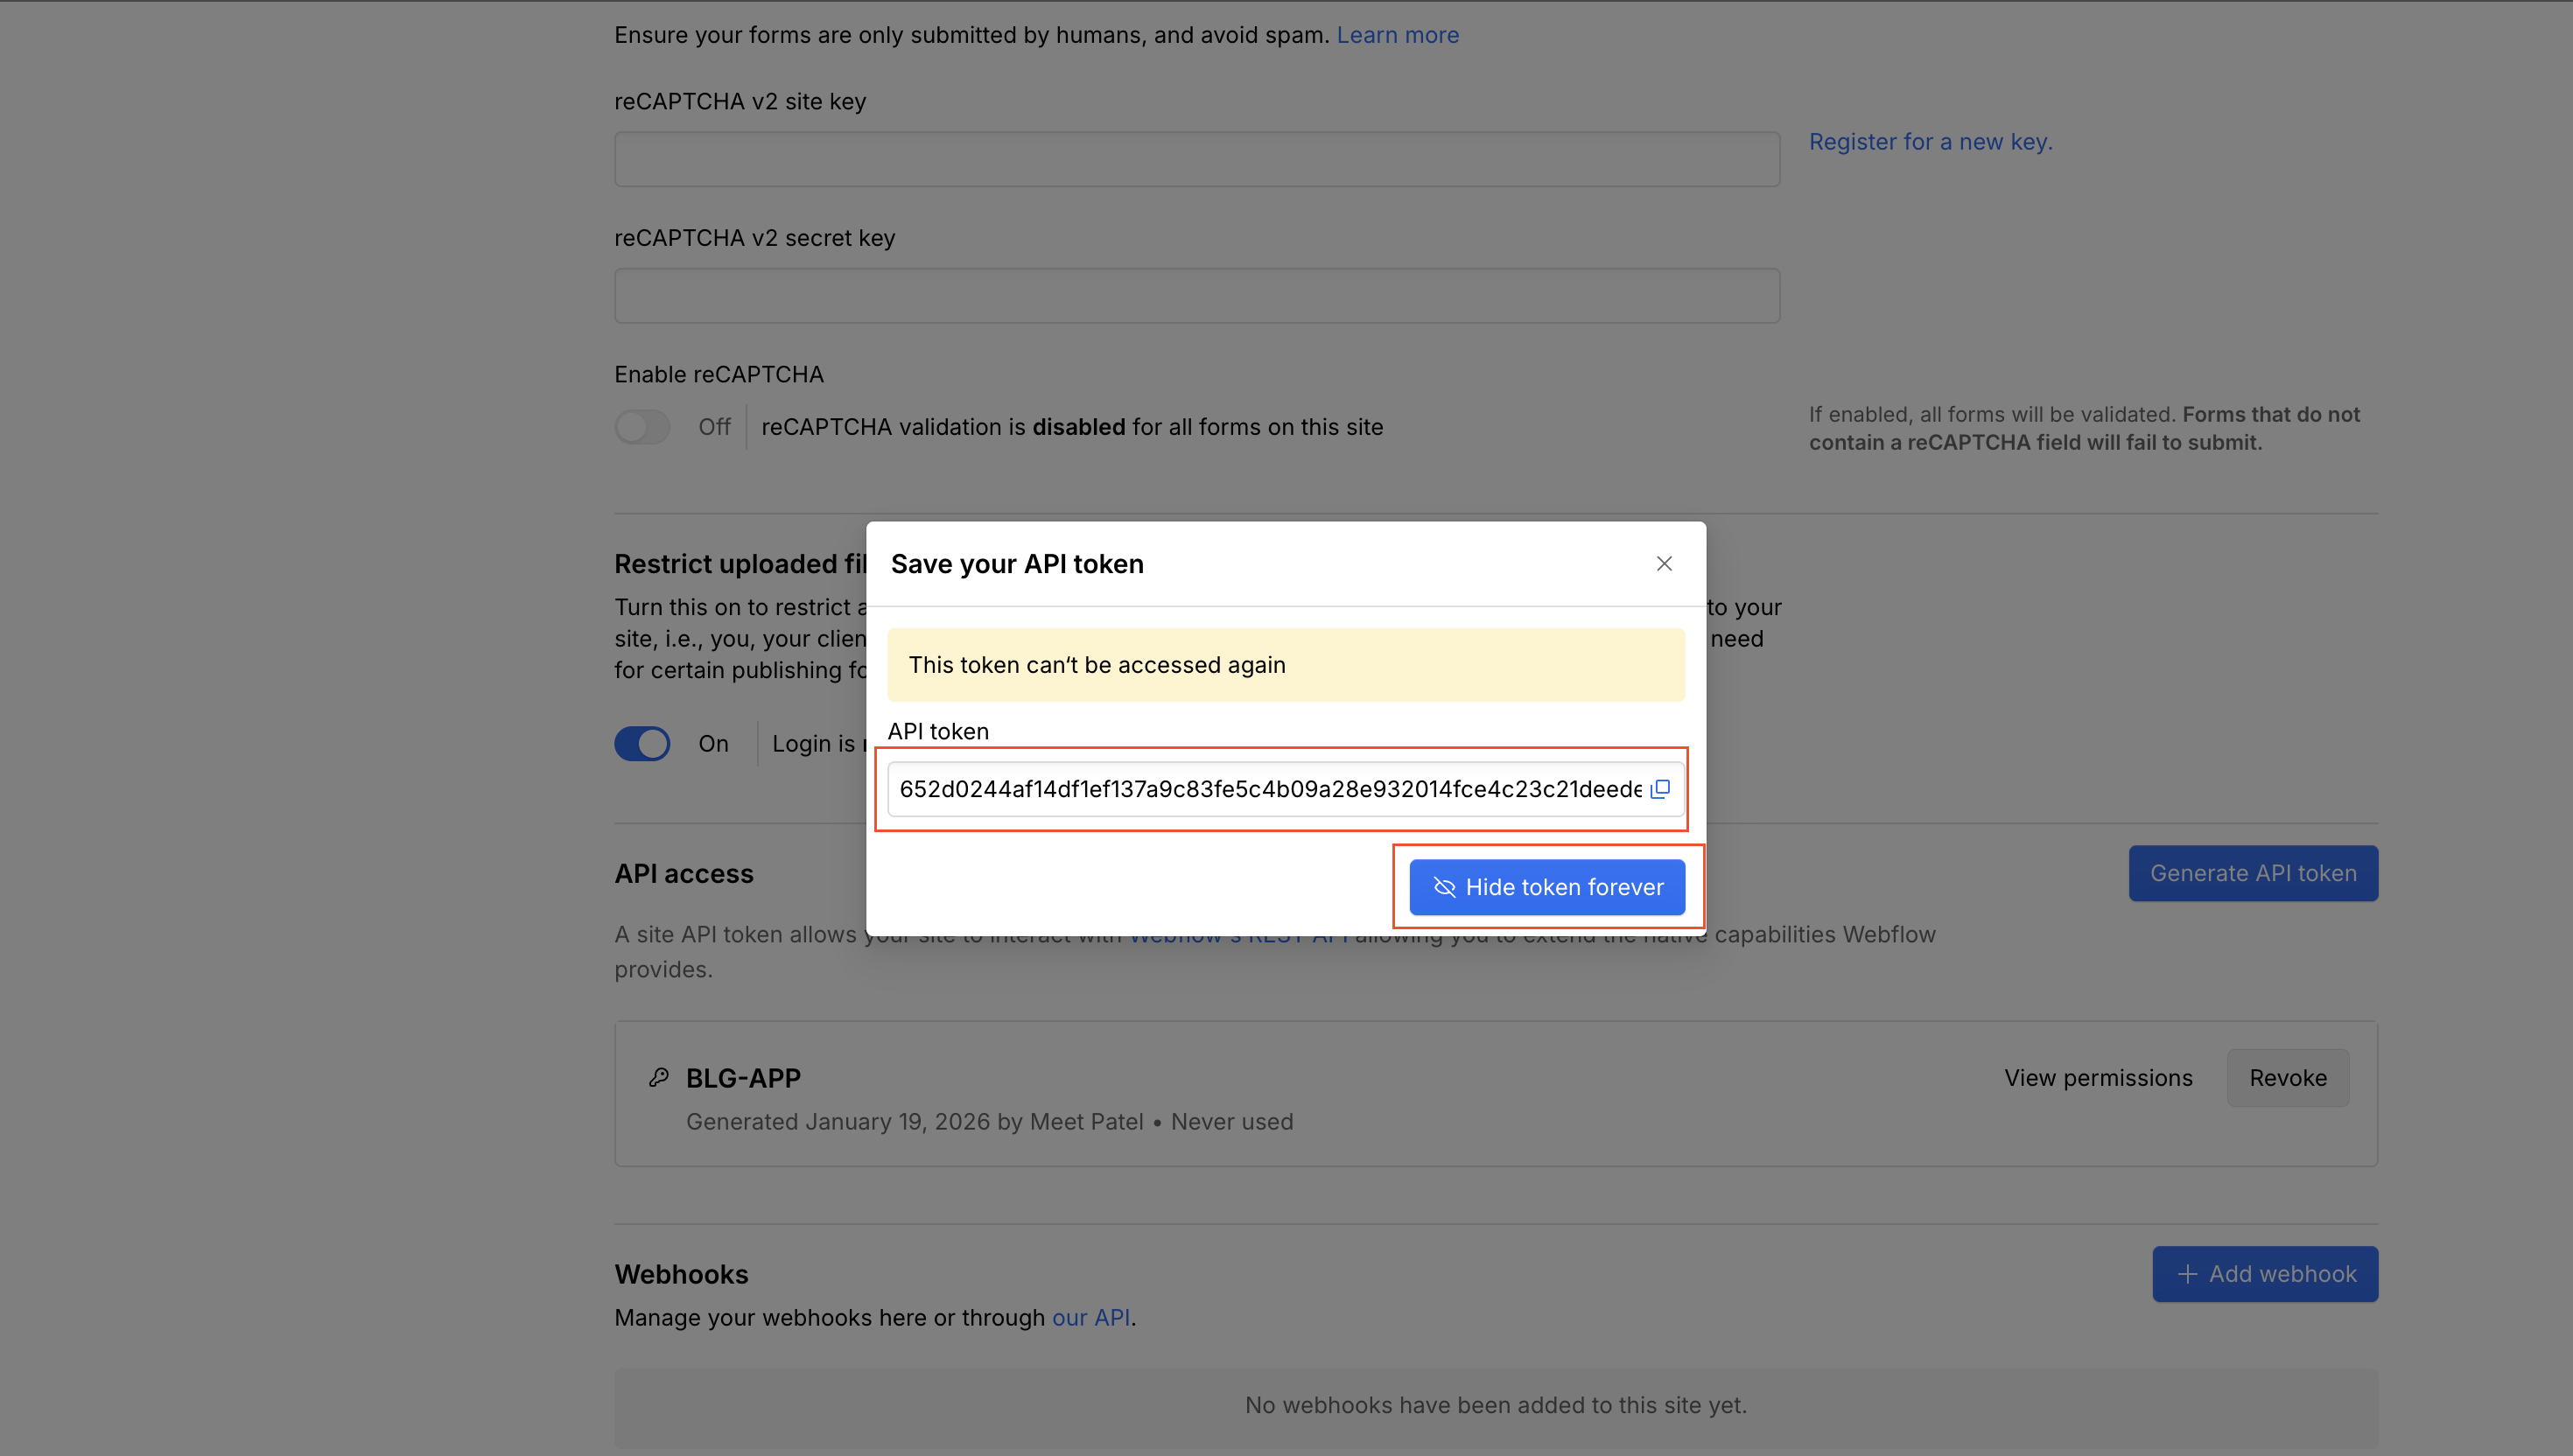
Copy your token
Copy the token and paste it in the field above. Webflow only shows it once — if you lose it, you'll need to generate a new one.
Troubleshooting & FAQ
Blog content not displaying in the Webflow Editor?
This is a known Webflow issue. Content may not display correctly in the Webflow Editor (visible code, broken layout). Your content publishes fine and will be visible on your live website.
Site or collection not showing?
Make sure your token has CMS: Read and Write and Sites: Read and Write permissions. If you changed permissions, generate a new token.
Publish fails?
Confirm the token is still valid and the collection exists. Check that item count or field limits in Webflow haven't been exceeded.
What if I regenerate my API token?
The old token stops working immediately. Disconnect here, then reconnect with the new token.
Will articles go live immediately?
Only if you enable auto-publish in your site settings. Otherwise articles are created as drafts so you can review them in Webflow first.
Do I need a specific Webflow plan?
You need a Webflow plan that includes CMS access and API capabilities (CMS plan or higher).
Wrong workspace or site?
Each site needs its own API token. Make sure you generated the token from the correct site's settings in Webflow.
What you get
Direct Publishing
Push articles to CMS collections automatically
Field Mapping
Customize how content maps to your fields
Auto Publish
Optional auto-publish to your live site
Delete Site Completely?
This action cannot be undone. All of the following will be permanently deleted:
- All articles and content
- Search terms and content calendar
- Webflow connection and field mappings
- Business analysis and settings
- Google Search Console data
Note: Articles already published to your Webflow site will remain there. This only deletes data from AutoSEO.
Select Webflow Site
Loading sites...
Choose which Webflow site you want to publish articles to:
Select CMS Collection
Loading collections...
Choose which CMS Collection to publish articles to:
Map Fields
Map your article fields to Webflow CMS fields:
Syncing Your Articles
Please wait while we publish your articles to Webflow...
Preparing articles...
🎉 All Done!
Your Webflow integration is complete!
Sync Error
Shopify Store Blog
Publish your expert articles to your Shopify blog on autopilot. Your content brings customers to your store.
Install AutoSEO on your Shopify Store
Publish SEO-optimized articles directly to your Shopify blog on autopilot.
What you get
Automatic Publishing
Articles publish to your Shopify blog automatically
SEO Optimized
Content optimized to bring customers to your store
Multilingual Support
Publish in multiple languages for international stores
Select Shopify Blog
Loading blogs...
Choose which blog you want to publish articles to:
Failed to load blogs. Please try again.
Wix Blog Integration
Publish your SEO-optimized articles directly to your Wix blog. Connect once and let your content work for you.
Connect Your Wix Site
Enter your Wix Site ID and API Key to start publishing articles to your Wix blog automatically.
Open your Wix dashboard — the Site ID is in the URL after dashboard/
Generate an API key in Wix: Avatar → Account Settings → API Keys. Enable Wix Contacts & Wix Blog permissions.
Find Your Site ID
Open your Wix dashboard. In the address bar, copy the ID after dashboard/.

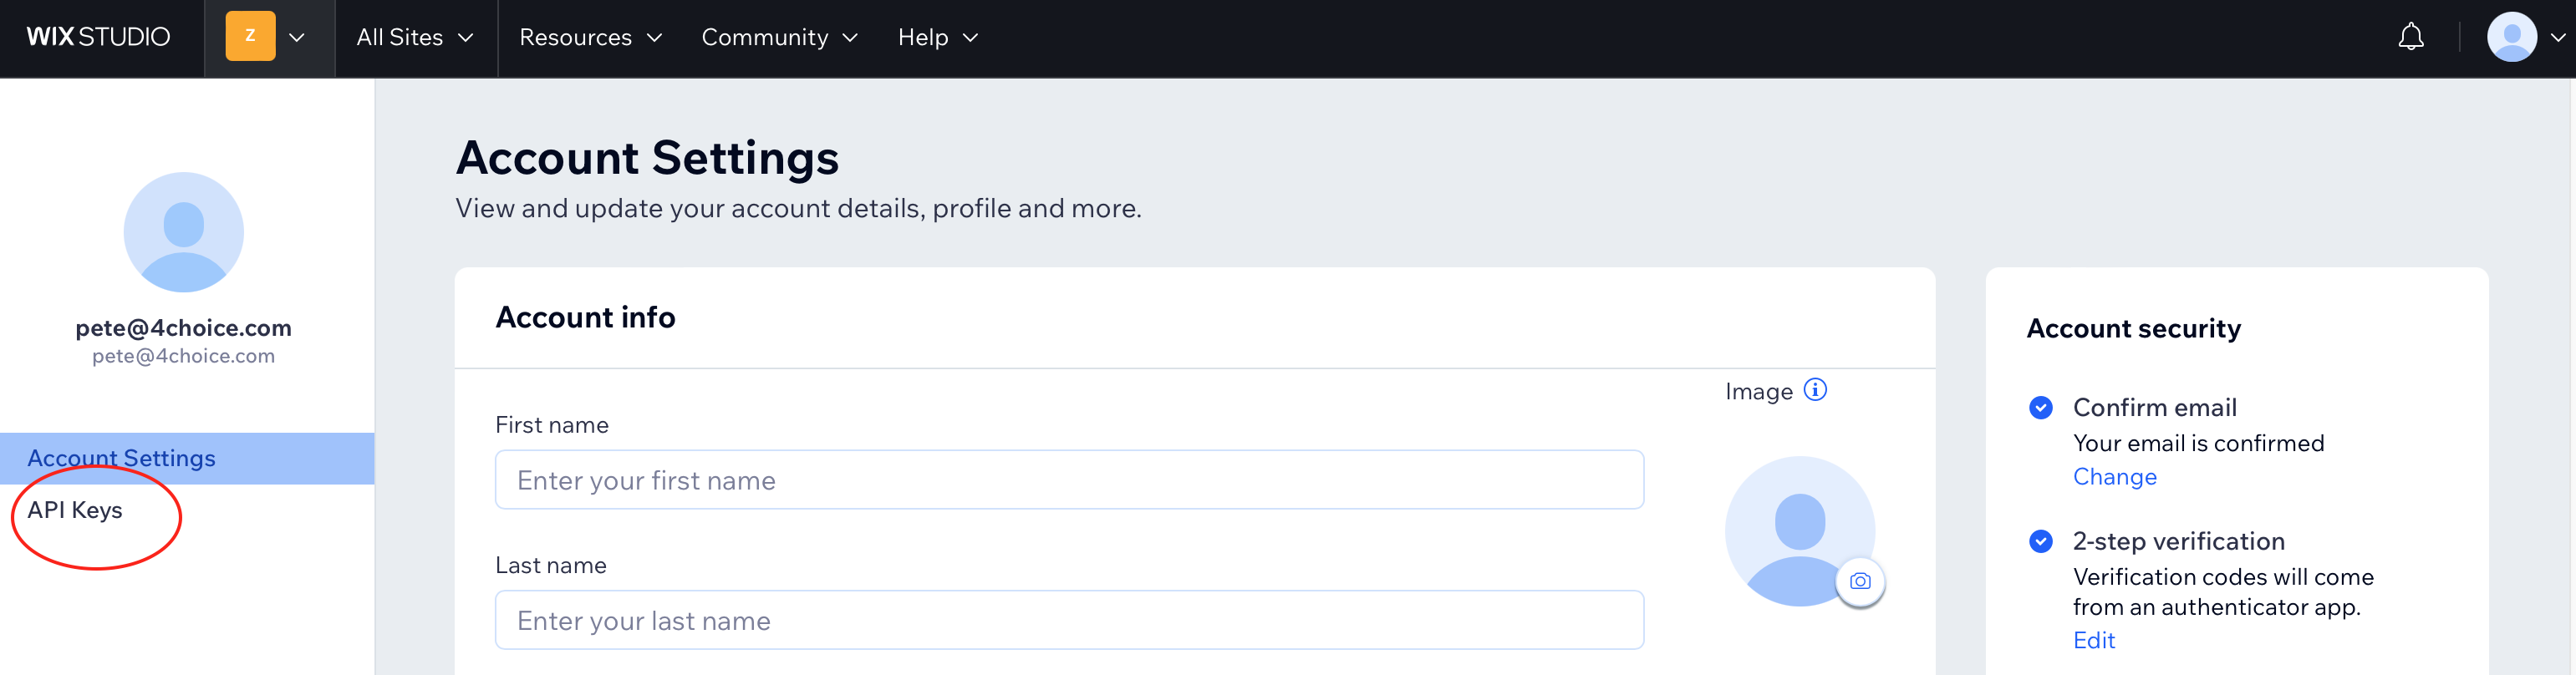
Open Account Settings
Click your avatar (top right) → Account Settings.
Go to API Keys
In the left sidebar, click API Keys.
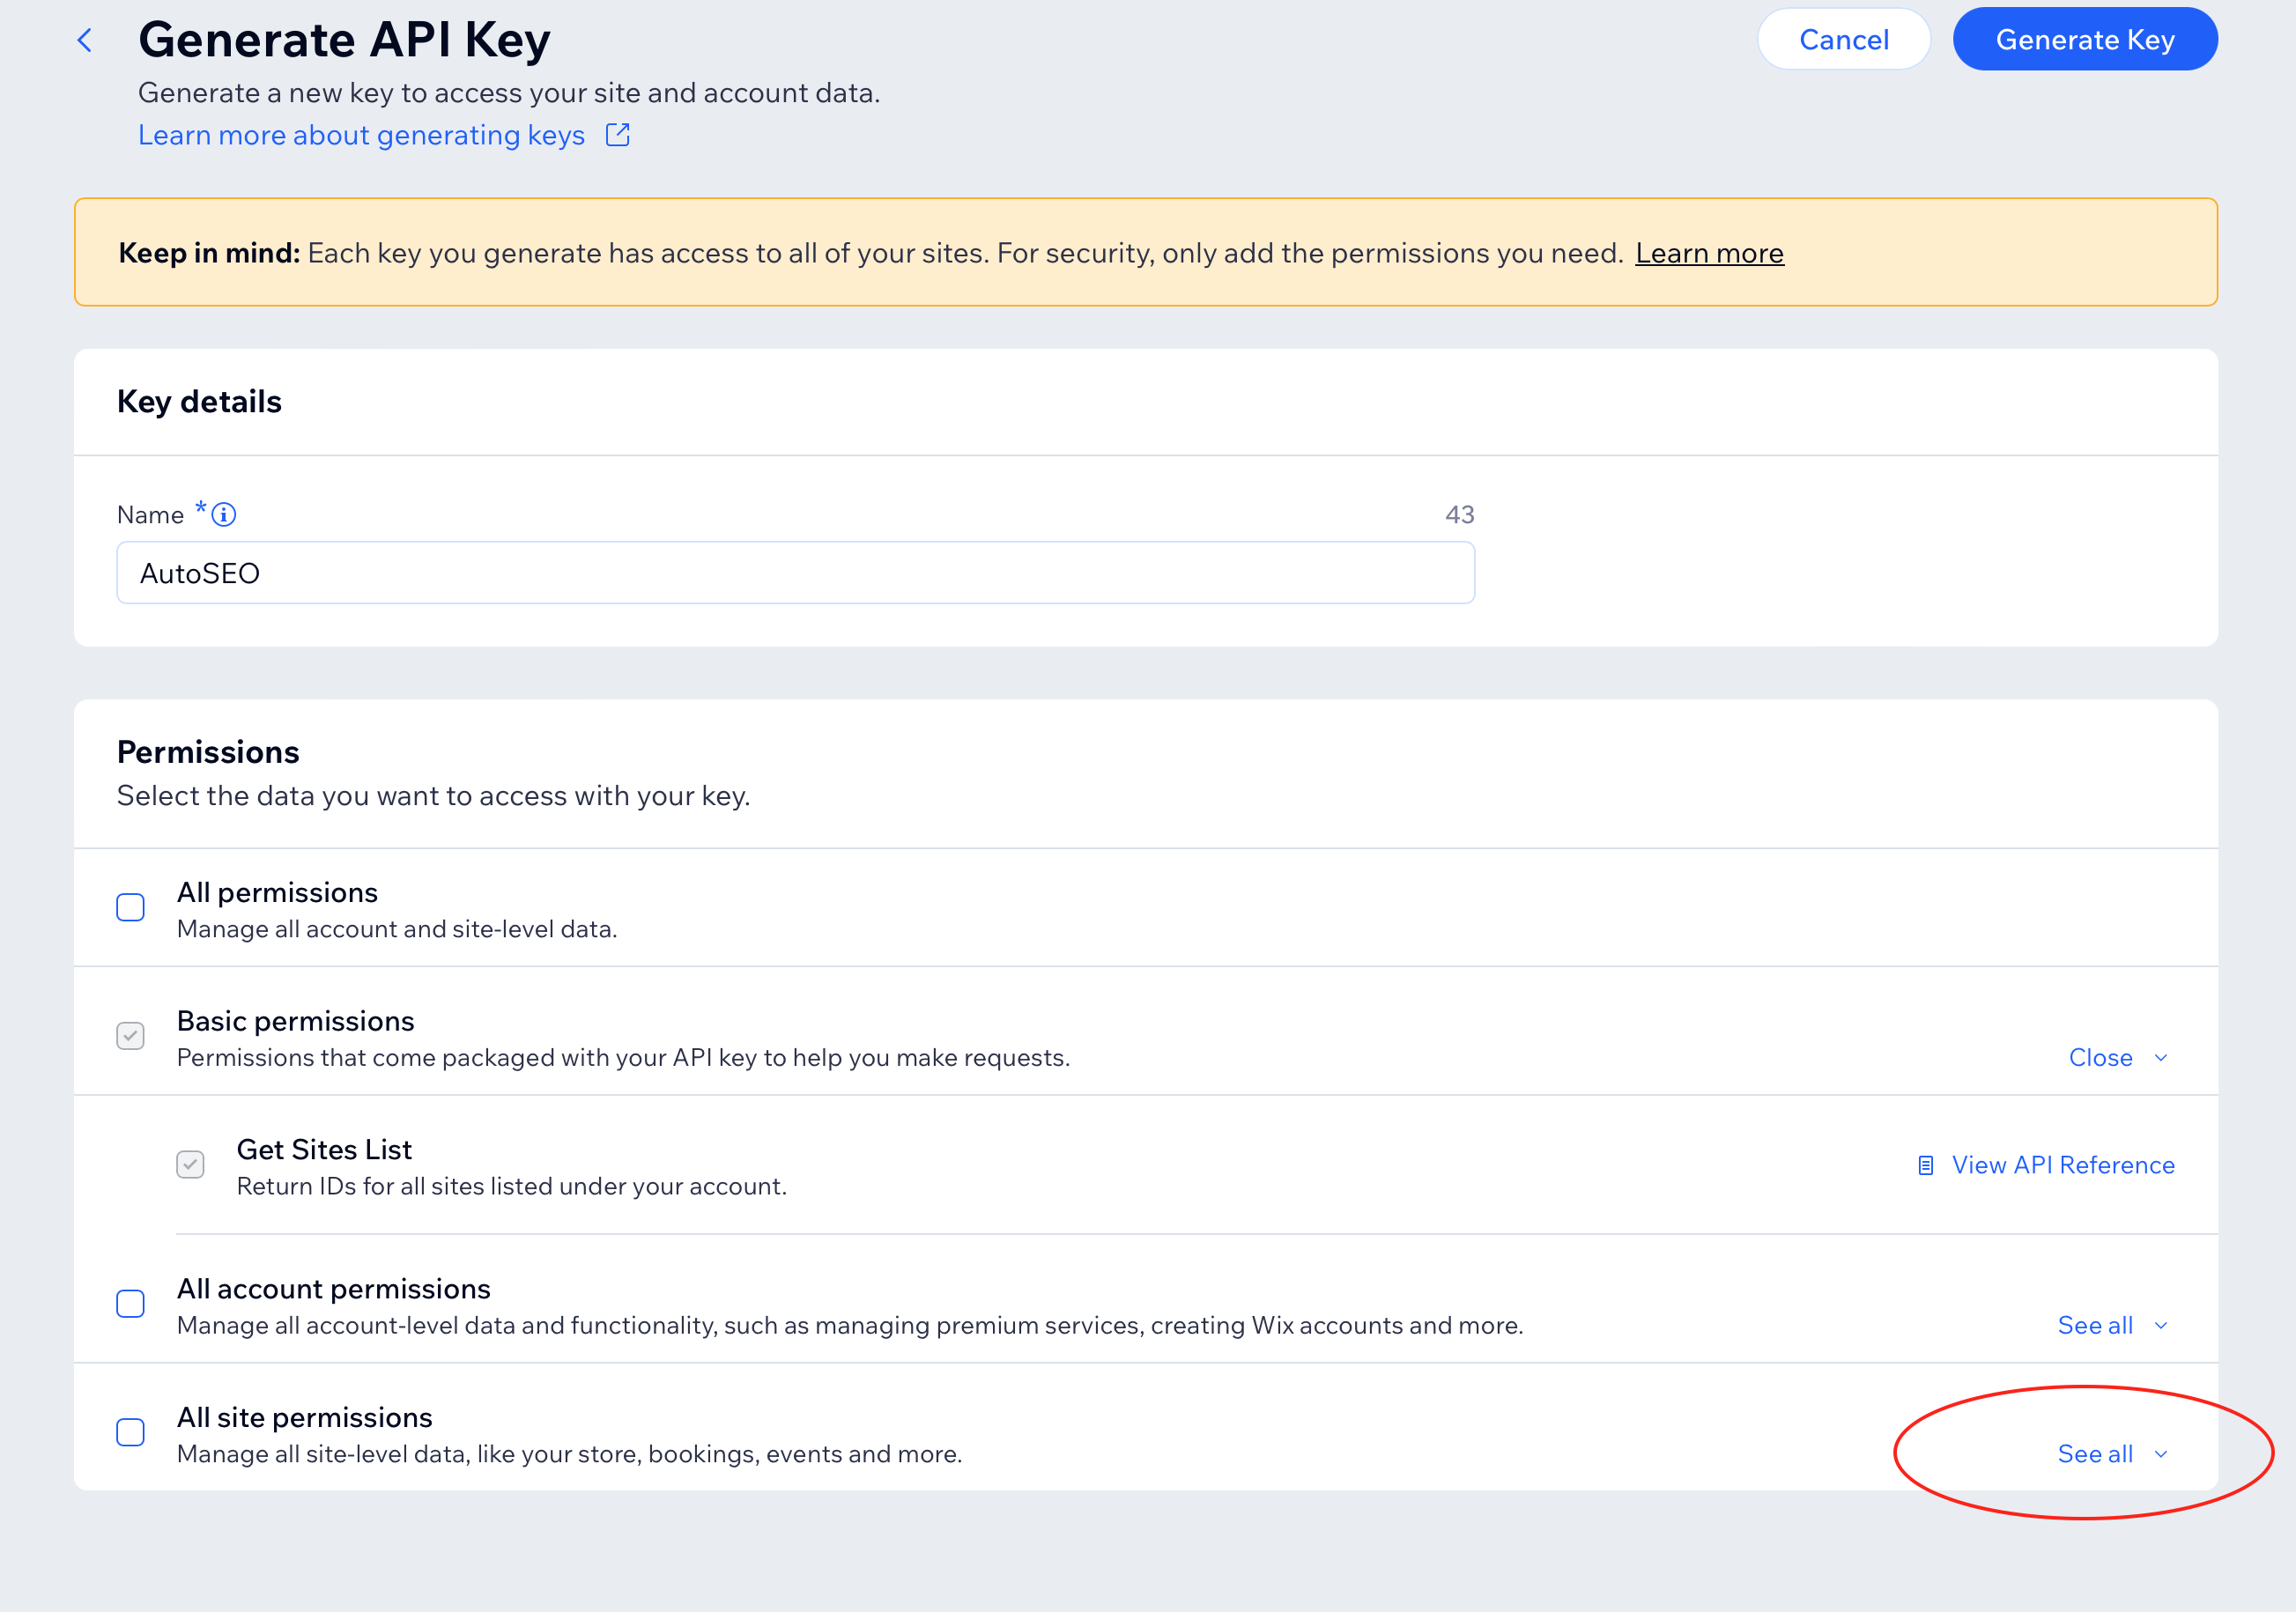
Click Generate API Key
Click the + Generate API Key button in the top right.

Name It & Expand Permissions
Name the key "AutoSEO". Under Permissions, find All site permissions and click See all to expand.
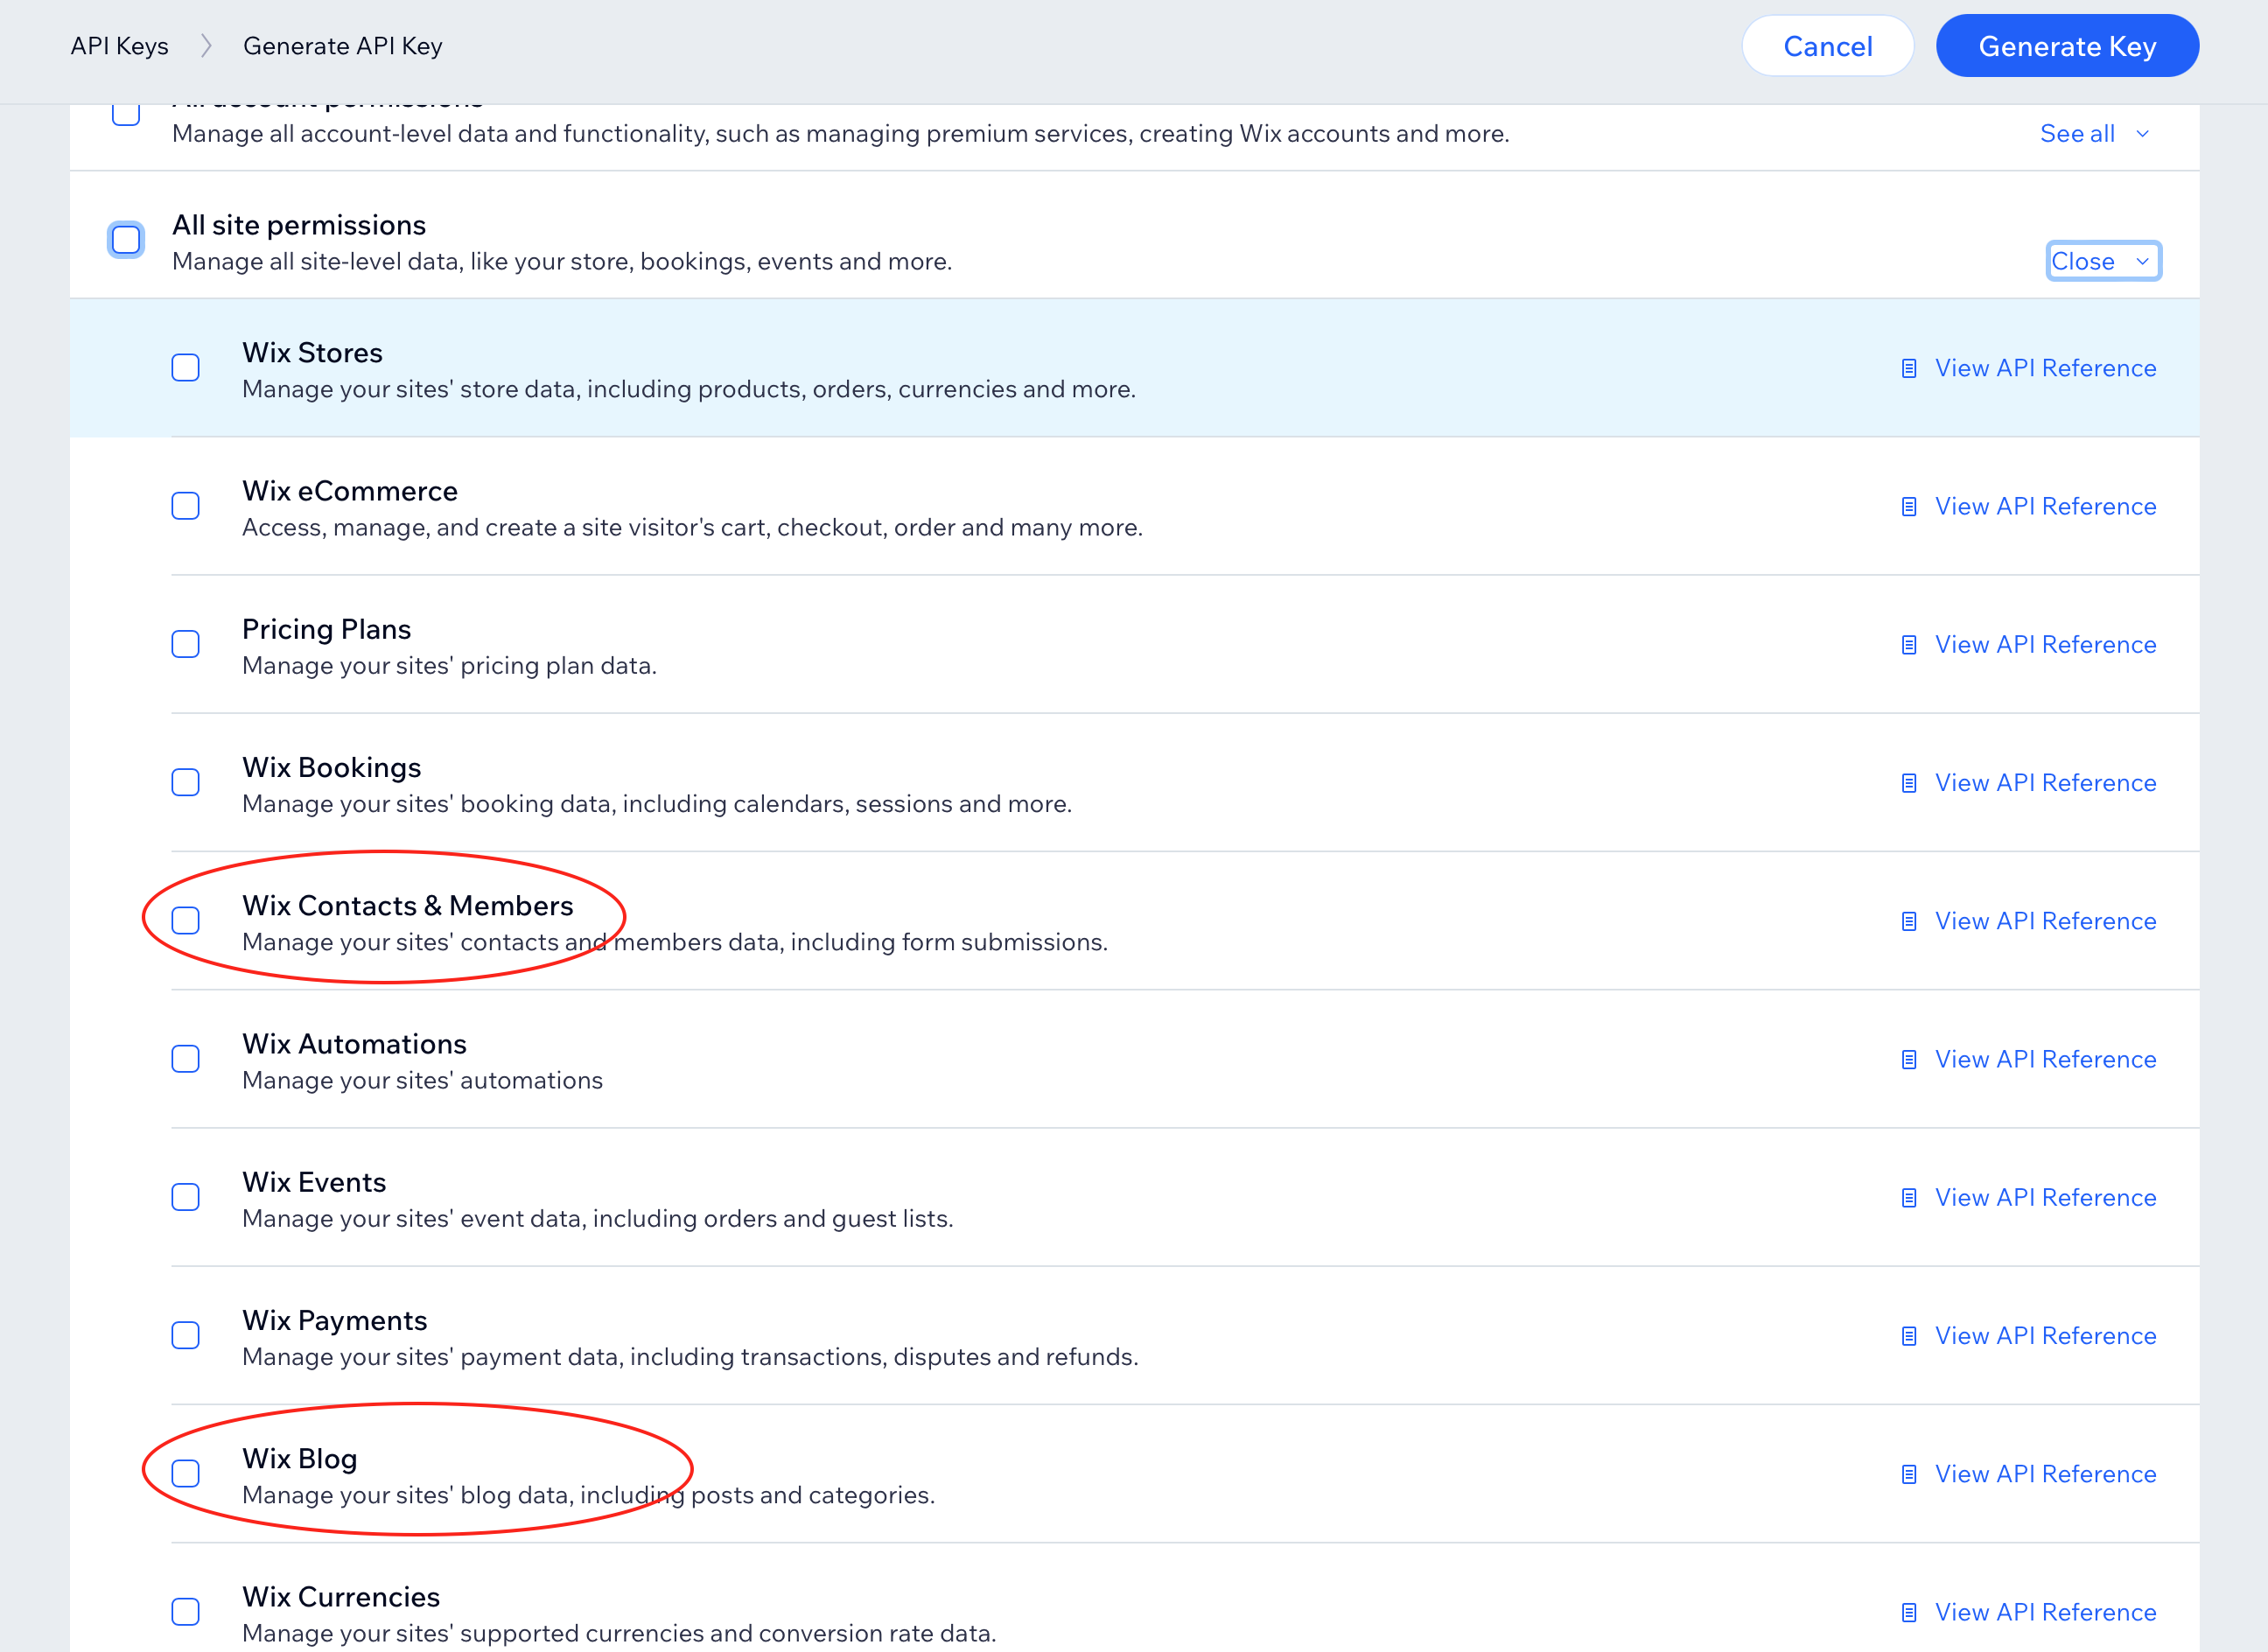
Enable Wix Contacts & Wix Blog
Scroll down and check the boxes for Wix Contacts & Members and Wix Blog.
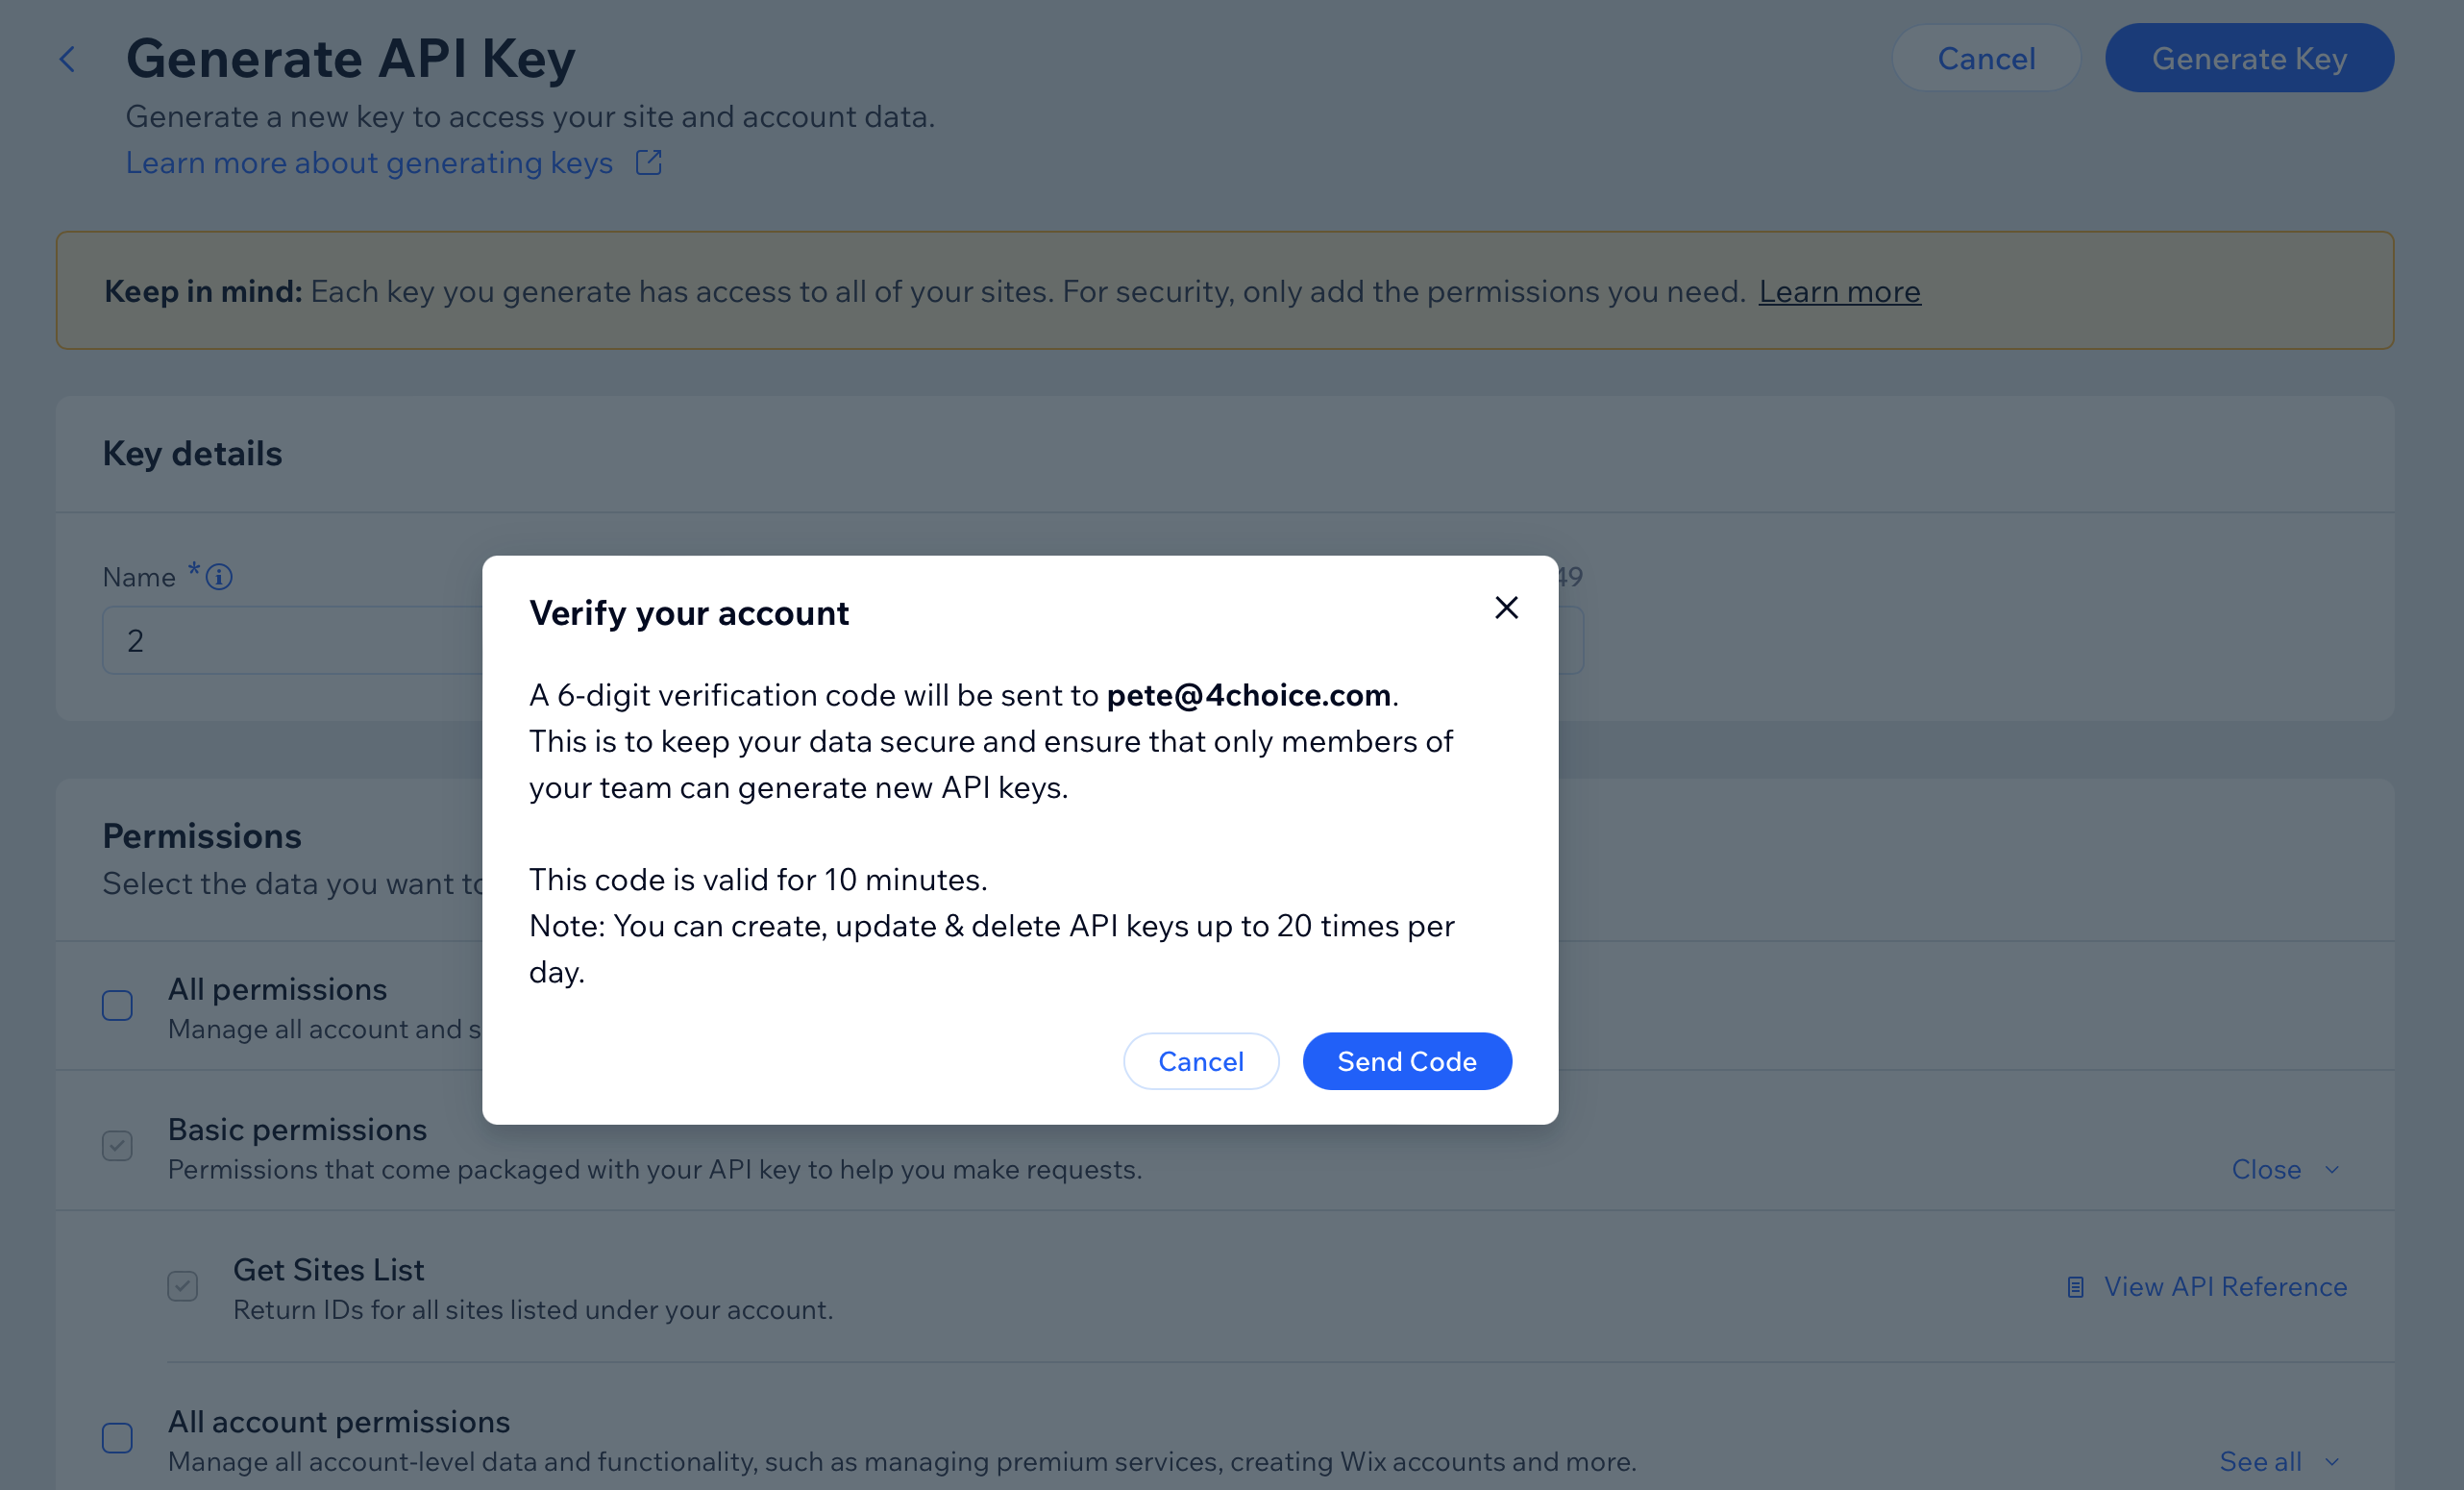
Generate & Verify
Click Generate Key. Wix will send a verification code to your email. Enter the code and click Verify & Generate Key.
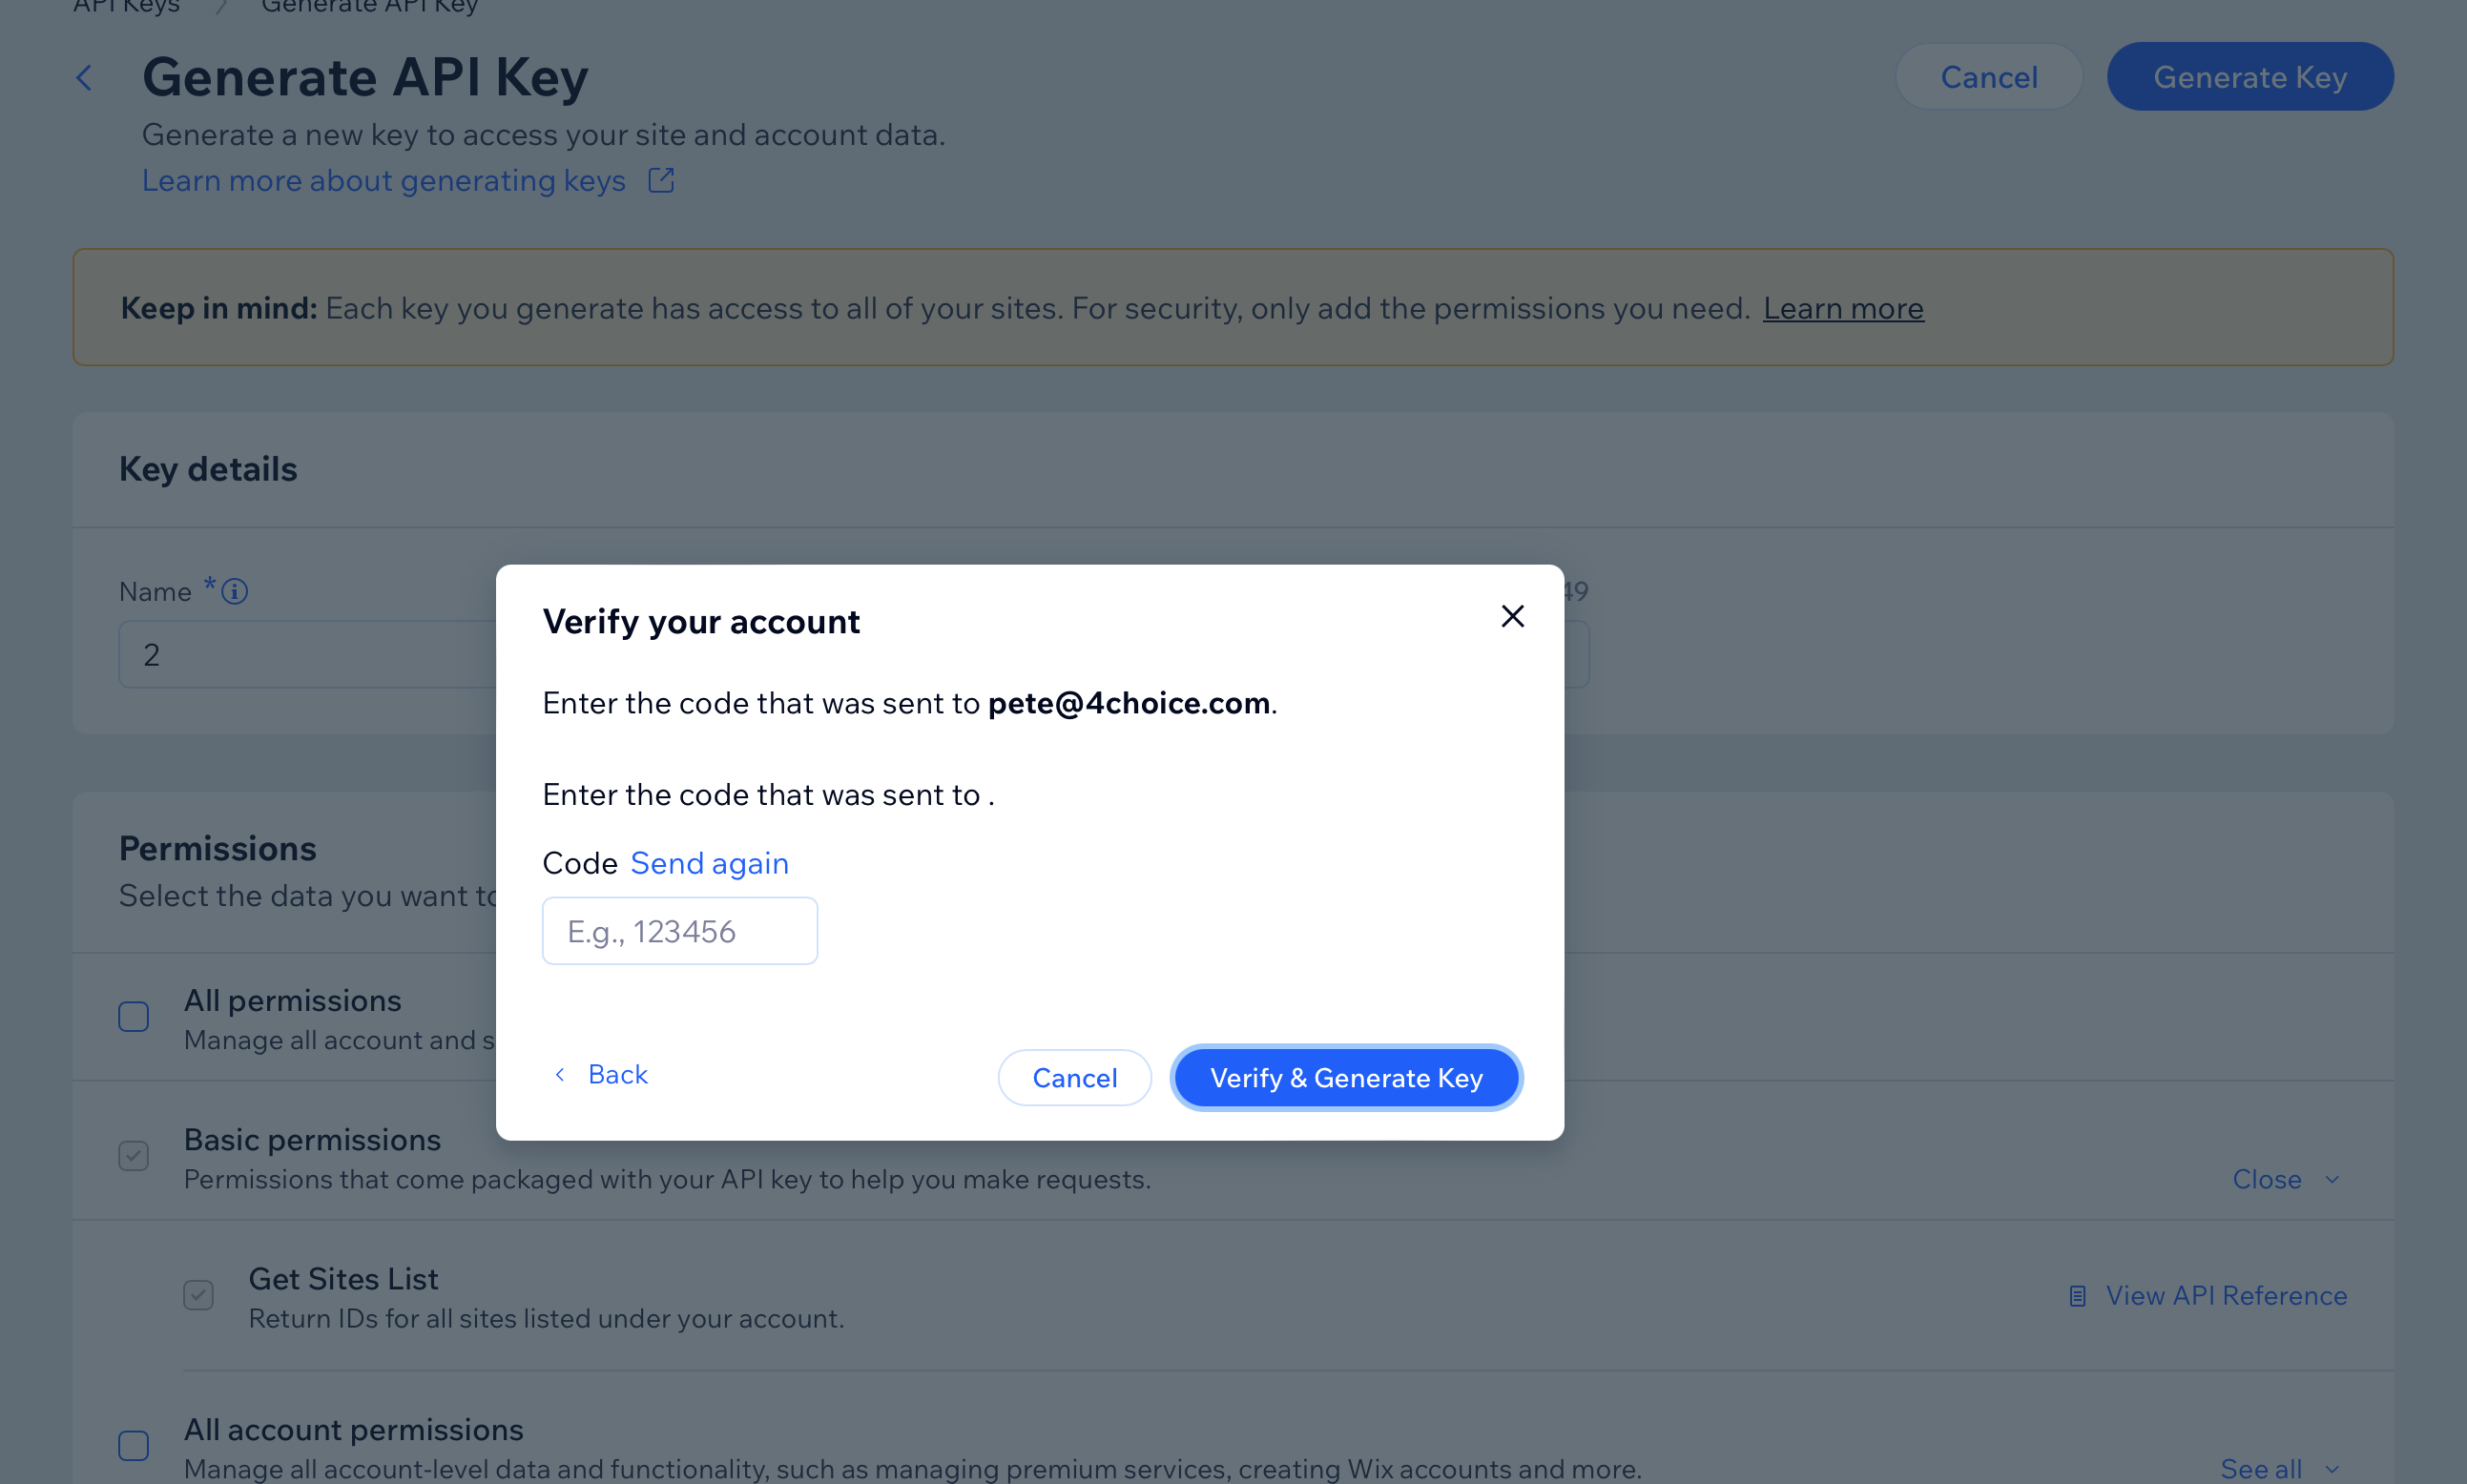
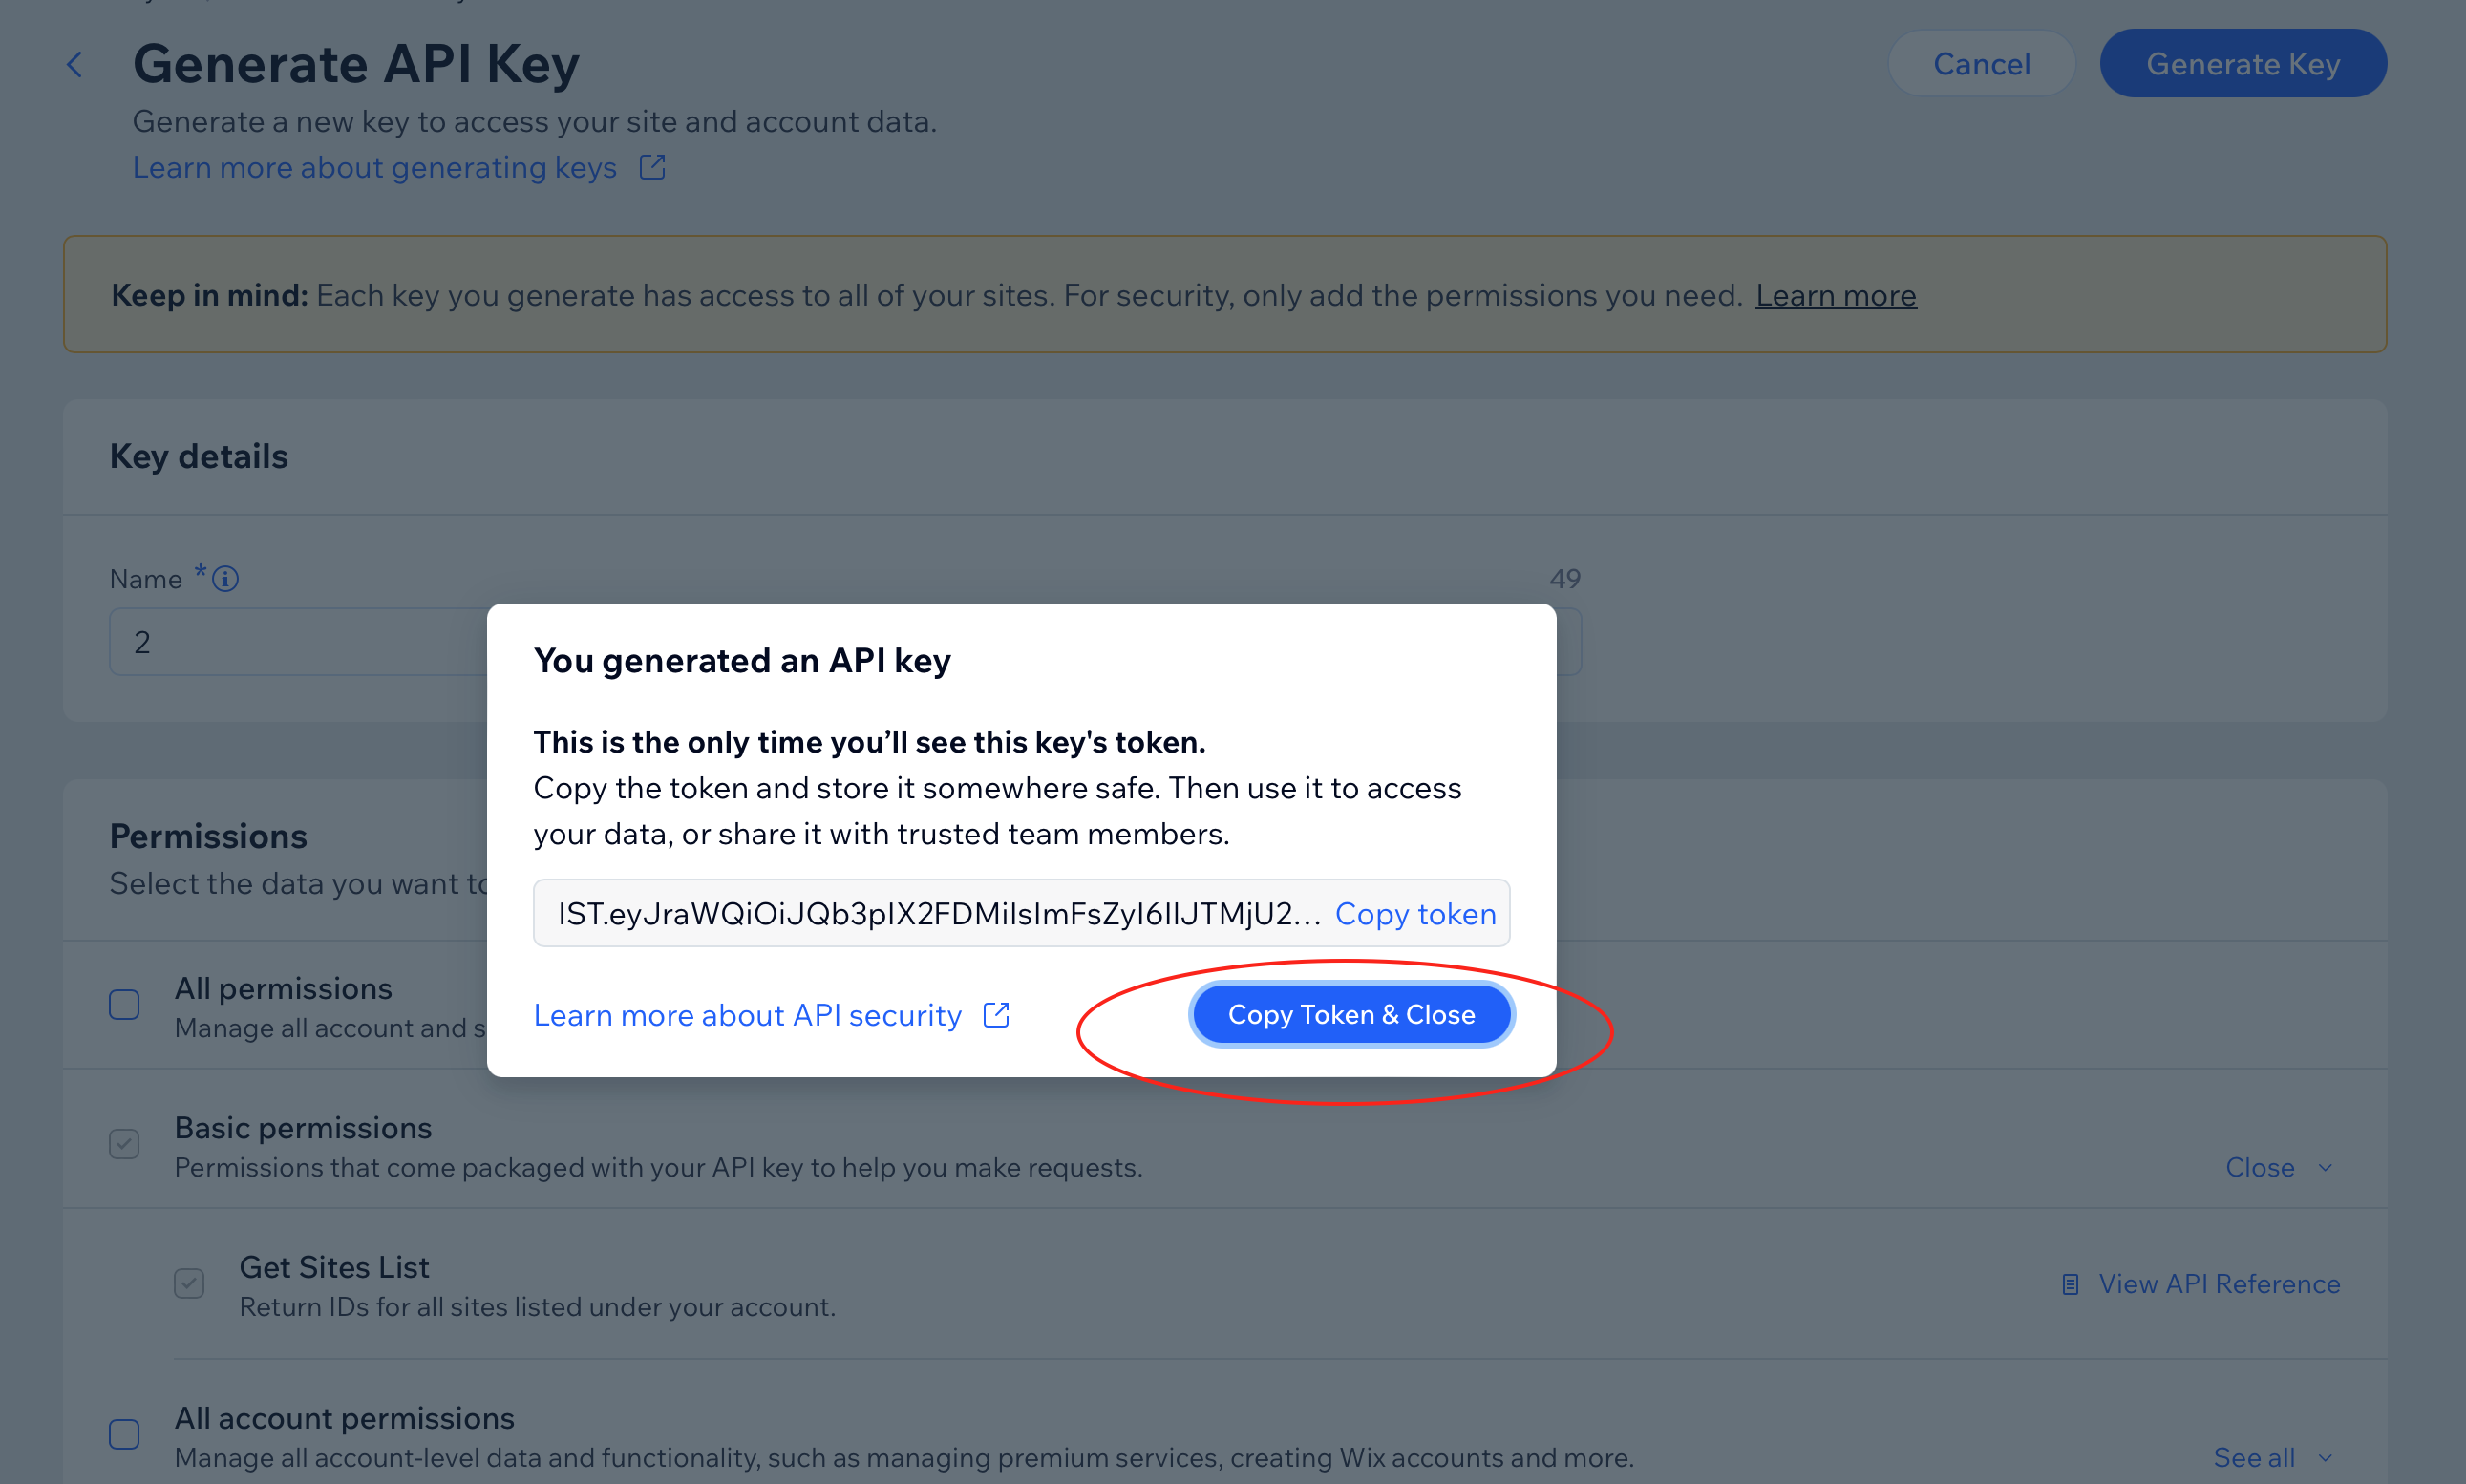
Copy the Token
Click Copy Token & Close. This is your API Key — you won't be able to see it again.
Paste & Connect
Enter your Site ID and API Key above, then click Connect. We'll verify the connection and start publishing your articles automatically.
Frequently Asked Questions
Site not connecting?
Double-check your Site ID from the URL after dashboard/ in your Wix dashboard.
API Key issues?
Regenerate the key in Wix and confirm both permissions (Wix Contacts & Members and Wix Blog) are enabled.
Publish fails?
Ensure your API Key is valid and has the required permissions. Verify that your blog exists in Wix.
Can I change publish status later?
Yes. Update your integration settings in AutoSEO to change between Publish Immediately and Draft mode.
What happens if I regenerate my API key?
You must update the new API key in AutoSEO. The old key will stop working immediately.
Need more help?
Contact support via the bottom-right chat icon.
What you get
Automatic Publishing
Articles publish to your Wix blog automatically
Rich Content
Full formatting with headings, images, and links
Hero Images
Cover images sync with your posts automatically
How to Add the Wix Blog App
Your Wix site needs the free Wix Blog app so we can publish articles. It only takes a minute:
-
1
Open your Wix Editor
Log in to Wix and open your site in the Editor.
-
2
Click "Add Apps" in the left sidebar
Look for the app market icon (grid of squares) on the left side.
-
3
Search for "Wix Blog" and click Add
It's free. Click "Add to Site" to install it.
-
4
Publish your Wix site
Click "Publish" in the top right to make the blog live.
-
5
Come back here and connect again
Once the Blog app is installed, try connecting your Wix site again. It should work right away.
Using Wix Studio? Go to Add Elements → Blog, then drag the blog widget onto your page.
Select Your Wix Site
Choose which Wix site you want to publish your articles to.
Loading your Wix sites...
Failed to load sites.
No sites found in your Wix account.
Make sure you have at least one site with a blog in your Wix account.
BigCommerce Blog Integration
Publish articles directly to your BigCommerce store blog
The part after store- in your BigCommerce URL.
From a Store-level API account with Content modify access.
WebDAV Credentials (optional - for image uploads)
Get Your Store Hash
Open your BigCommerce store URL. In the address bar, copy the part between store- and .mybigcommerce.com.
Example: https://store-mh5fua96uw.mybigcommerce.com/... → Store Hash: mh5fua96uw
Open API Accounts
In BigCommerce, go to Settings (left sidebar) → scroll down to the API section → click Store-level API accounts.
Create API Account
Click Create API account (top right). Select token type V2/V3 API token. Name it "AutoSEO".
Set Content Permission
Under Content, choose modify access. This allows AutoSEO to create and update blog posts.
Save & Copy the Access Token
Click Save. Copy the Access Token immediately. BigCommerce only shows it once.
Get WebDAV Credentials (optional)
In BigCommerce, go to Settings → scroll to Advanced → click File access (WebDAV). Copy the WebDAV Path, Username, and Password.
These credentials allow AutoSEO to upload article thumbnail images to your store.
Paste & Connect
Enter your Store Hash and Access Token above, then click Connect. We'll verify the connection and start publishing your articles automatically.
Frequently Asked Questions
Store not connecting?
Double-check your Store Hash from the URL between store- and .mybigcommerce.com.
Access Token issues?
Create a new API account in BigCommerce and confirm Content is set to modify.
Images not uploading?
Ensure your WebDAV credentials are correct. Go to Settings → Advanced → File access (WebDAV) to verify.
What happens if I regenerate my API key?
You must update the new Access Token in AutoSEO. The old token will stop working immediately.
Need more help?
Contact support via the bottom-right chat icon.
What you get
Automatic Publishing
Articles publish to your BigCommerce blog automatically
Rich HTML Content
Full formatting with headings, images, and links
Image Thumbnails
Hero images uploaded via WebDAV as post thumbnails
Duda Blog Integration
Publish articles directly to your Duda website blog
Found in the URL bar when editing your site in the Duda editor.
Find Your Site Name
Open the Duda editor for your site. The site_name is in the URL bar — it's the unique identifier for your site (a long alphanumeric string).
Example: https://my.duda.co/home/site/1501ccca016a4220861ef07fe2c8eb0d
Open API Access Settings
In your Duda dashboard, go to White Label (left sidebar) → API Access. This is where your API credentials are located.
Note: API access requires a Duda Agency plan or higher.
Copy Your API Username & Password
Your API Username and API Password are shown on the API Access page. If you haven't set a password yet, you can reset it to generate one.
If you reset your password, existing integrations using the old password will stop working.
Make Sure Your Site Has a Blog
Open the Duda editor for your site. If you haven't already, add the Blog feature from the editor. Your site needs a blog enabled for AutoSEO to publish articles.
Paste & Connect
Enter your Site Name, API Username, and API Password above, then click Connect. We'll verify the connection and start publishing your articles automatically.
Frequently Asked Questions
Where do I find API Access?
Log in to Duda → White Label (left sidebar) → API Access. If you don't see this option, your plan may not include API access.
What plan do I need?
Duda's Blog API requires an Agency plan or higher. Contact Duda if you're on a lower plan.
Site not connecting?
Double-check the Site Name from your Duda URL. Make sure the blog feature is enabled on your site.
What happens if I reset my API password?
You must update the new password in AutoSEO. The old password will stop working immediately.
Need more help?
Contact support via the bottom-right chat icon.
What you get
Automatic Publishing
Articles publish to your Duda blog automatically
Rich HTML Content
Full formatting with headings, images, and links
Hero Images
Cover images sync with your posts automatically
RSS & JSON Feeds
Programmatic access to your published articles for static site generators and other integrations
Feed Not Enabled
Enable RSS & JSON feeds to integrate your published articles with Hugo, Jekyll, Gatsby, Next.js, Eleventy, and other static site generators or RSS readers.
Features
RSS 2.0 & JSON Feed v1
Standards-compliant feeds with full content support
Secure Token-Based Access
Rotate tokens without downtime, revoke anytime
Published Articles Only
Only published & non-future-dated articles included
Fast & Cached
60-second caching with ETag support for efficiency
Set Up Your Sitemap
Required for backlink exchange participation
Why do we need your sitemap?
Your sitemap helps us verify that backlinks we insert into your articles are published on your site. This allows you to participate in our backlink exchange and receive links from other sites in our network.
HubSpot Blog Integration
Publish articles directly to your HubSpot CMS blog
Found in your HubSpot Private App settings. We'll auto-detect your blog.
Open Your HubSpot Settings
Log in to app.hubspot.com and click the gear icon (Settings) in the top navigation bar.
Create a Private App
In the left sidebar, go to Integrations → Private Apps. Click "Create a private app".
Give it a name like AutoSEO Blog Publisher.
Set the Required Scopes
Click the "Scopes" tab. Under CMS, find "Blog" and enable Read and Write permissions.
This allows AutoSEO to create, update, and publish blog posts on your behalf.
Create the App & Copy the Token
Click "Create app", then confirm. HubSpot will show your access token. Click "Show token" and copy it.
The token starts with pat-na1- or similar. Keep it safe — you won't be able to see it again.
Paste the Token Above & Connect
Paste your access token in the field above and click Connect. We'll automatically detect your blog and start publishing articles there.
Common questions
Which HubSpot plan do I need?
The Blog API requires Content Hub Professional or higher. Starter and Free plans don't include blog API access.
Do I need to be a super admin?
Yes. Only super admins can create Private Apps in HubSpot.
What if I have multiple blogs?
We'll automatically select your first blog. If you have multiple, articles will be published to the primary one.
Auto-publish
Articles go live on your HubSpot blog automatically
Full SEO
Meta titles, descriptions, and featured images included
Keeps in sync
Content updates and deletions sync automatically
GoHighLevel Blog Integration
Publish articles directly to your GoHighLevel blog
Found in your GoHighLevel Private Integration settings.
Your sub-account ID. Found in Settings → Business Profile, or in the URL when logged in.
Open Your GoHighLevel Settings
Log in to app.gohighlevel.com and click Settings in the bottom-left sidebar.
Create a Private Integration
Navigate to Settings → Integrations → Private Integrations. Click "Create new Integration".
Give it a name like AutoSEO Blog Publisher.
Set the Required Permissions
On the Scopes step, enable these blog-related permissions:
- blogs/post.write – Create blog posts
- blogs/post-update.write – Update blog posts
- blogs/list.readonly – List available blogs
- blogs/author.readonly – Get blog authors
Copy the Token
After creating the integration, copy the generated token. You won't be able to see it again later.
Paste it in the "Private Integration Token" field above.
Find Your Location ID
Go to Settings → Business Profile. Your Location ID (also called Sub-Account ID) is displayed there, or you can find it in the URL bar when logged into a sub-account.
It looks like a long alphanumeric string, e.g. ve9EPM428h8vShlRW1KT
Click Connect
Paste both values above and click "Connect". We'll automatically find your blog and start publishing articles.
Common Questions
Do I need a specific GoHighLevel plan?
You need a GoHighLevel plan that includes the Blog/Website Builder feature. Most Agency plans include this.
Where do I find my Location ID?
Log into your sub-account. Go to Settings → Business Profile. The Location ID is displayed on that page. You can also find it in the URL bar.
Is my token stored securely?
Yes, your Private Integration token is encrypted before storage and never shown in plain text.
Can I remove articles from GoHighLevel?
When you delete an article here, it will be archived on GoHighLevel automatically. You can fully delete it from GoHighLevel's blog manager if needed.
Squarespace Blog Integration
Publish articles directly to your Squarespace website blog
Important security steps before connecting
- Create a unique password in your Squarespace account just for this connection. Do NOT reuse a password from any other account.
- Turn off two-factor authentication and login verification on your Squarespace account. (How to manage 2FA)
Your password is encrypted with AES-256 and never stored in plain text.
The address people visit your site at — e.g. yourbusiness.com. We'll figure out the rest.
Change Your Squarespace Password
Go to your Squarespace Account Security settings and change your password to a new, unique password that you don't use anywhere else.
Why? This protects your other accounts. If you ever disconnect AutoSEO, just change your Squarespace password back.
Turn Off Login Verification & 2FA
In your Account Security settings, disable both two-factor authentication (2FA) and any email-based login verification. AutoSEO needs to log in to publish articles and cannot pass verification codes.
Make Sure Your Site Has a Blog
In the Squarespace editor, make sure you have a Blog page added. If you don't have one yet, add it from Pages → + → Blog.
Enter Your Credentials & Connect
Fill in the form above with your website address (e.g. yourbusiness.com), your Squarespace email, and your new unique password. Then click Connect.
Don't worry about getting the domain format exactly right — we'll automatically detect the correct one from your Squarespace account.
Frequently Asked Questions
Why do I need a unique password?
Your password is encrypted and stored securely, but using a unique password ensures your other accounts stay safe no matter what. You can always change it back later.
Why do I need to turn off 2FA and login verification?
AutoSEO logs into your Squarespace account to publish articles. Any verification step (2FA, email codes, or login verification) blocks automated logins because there's no way to enter the code automatically.
Is my password stored securely?
Yes. Your password is encrypted with AES-256 — the same encryption standard used by banks and governments. It is never stored in plain text.
What should I enter for the website address?
Enter the address your visitors use — like yourbusiness.com. We'll automatically detect the correct Squarespace site from your account, so you don't need to worry about the exact format.
What if I change my Squarespace password later?
You'll need to update it here too — come back to this page and enter your new password. We'll let you know if your password stops working.
What happens if I disconnect?
Your published articles remain on your Squarespace site. We delete your stored credentials immediately. You can then change your Squarespace password back to your regular one.
Need more help?
Contact support via the bottom-right chat icon.
What you get
Automatic Publishing
Articles publish to your Squarespace blog automatically
Rich HTML Content
Full formatting with headings, images, and links
SEO Metadata
Meta titles, descriptions, and hero images included
Confirm Unique Password
Before connecting, please confirm that the password you entered is unique to Squarespace and is NOT used for any other account (email, banking, social media, etc.).
Connecting to Squarespace
Squarespace uses strong security protections, so connecting can take a few attempts. We'll try up to 5 times — hang tight.
Hosted Blog
We host your blog for you. Just point a subdomain and your articles are live.
Set up your domain
Enter the subdomain you want for your blog (e.g. blog.basecamp.com)
Confirm your logo
We couldn't find a logo on your site. Please upload one:
Choose accent color
This color will be used for links, buttons, and highlights on your blog.
Webhook Integration
Send articles to any endpoint automatically. Works with custom CMS platforms, Zapier, Make, n8n, and more.
Skip the manual setup — use our AI vibe coding prompt instead
We've written a ready-to-go prompt you can paste into Cursor, Claude Code, or any AI coding assistant to build your webhook endpoint in seconds.
Must be a public URL that accepts POST requests with JSON body.
Sent as Authorization: Bearer <your-token> with every webhook delivery. We've generated this token for you — don't change it unless you also changed it in your endpoint code or Lovable prompt.
What We Send
POST
Content-Type: application/jsonAuthorization: Bearer aseo_wh_2e5a43307f68fb094354b92455aff530X-AutoSEO-Event: article.publishedX-AutoSEO-Signature: <HMAC-SHA256 hash>X-AutoSEO-Delivery: <unique delivery UUID>Example Payload
{
  "event": "article.published",
  "id": 42,
  "title": "How to Grow Your Business with SEO",
  "slug": "how-to-grow-your-business-with-seo",
  "metaDescription": "Learn practical SEO strategies to attract more customers...",
  "content_html": "<h1>How to Grow Your Business...</h1><p>Full HTML content...</p>",
  "content_markdown": "# How to Grow Your Business...\n\nFull markdown content...",
  "heroImageUrl": "https://cdn.example.com/hero-image.jpg",
  "heroImageAlt": "Alt text for the hero image",
  "infographicImageUrl": "https://cdn.example.com/infographic.png",
  "keywords": ["seo strategies"],
  "metaKeywords": "seo, business growth, marketing",
  "wordpressTags": "seo, marketing, growth",
  "faqSchema": [{"question": "What is SEO?", "answer": "SEO stands for..."}],
  "languageCode": "en",
  "status": "published",
  "publishedAt": "2026-03-04T10:30:00.000Z",
  "updatedAt": "2026-03-04T10:30:00.000Z",
  "createdAt": "2026-03-04T09:00:00.000Z"
}
Payload Fields
| Field | Type | Description |
|---|---|---|
| event | string | article.published or test |
| id | integer | Unique article ID |
| title | string | Article title |
| slug | string | URL-friendly slug |
| metaDescription | string | SEO meta description (150-160 chars) |
| content_html | string | Full article in HTML |
| content_markdown | string | Full article in Markdown |
| heroImageUrl | string|null | Featured hero image URL |
| heroImageAlt | string|null | Alt text for the hero image |
| infographicImageUrl | string|null | Infographic image URL (if enabled) |
| keywords | array | Target keywords |
| metaKeywords | string|null | Comma-separated SEO keywords |
| wordpressTags | string|null | Comma-separated tags |
| faqSchema | array|null | FAQ structured data (question/answer pairs) |
| languageCode | string | ISO language code (e.g. en, es, de) |
| status | string | Always published for webhook deliveries |
| publishedAt | string | ISO 8601 publication timestamp |
| updatedAt | string | ISO 8601 last updated timestamp |
| createdAt | string | ISO 8601 creation timestamp |
Response Format (recommended)
Return a JSON response with the published URL so we can link directly to the live article in your dashboard. We check for url, published_url, or permalink fields.
// Your endpoint should return:
HTTP 200
Content-Type: application/json

{
  "url": "https://yoursite.com/blog/how-to-grow-your-business-with-seo"
}
If you can't return a URL, just return an HTTP 200. You'll be able to add the URL manually from your content calendar.
Verifying Webhook Signatures
Every webhook includes an X-AutoSEO-Signature header — an HMAC-SHA256 hash of the JSON body using your bearer token. Verify it to confirm the request came from AutoSEO.
// Node.js / Express example
const crypto = require('crypto');
const SECRET = 'aseo_wh_2e5a43307f68fb094354b92455aff530';

// IMPORTANT: Use the raw request body string, not JSON.stringify(parsed).
// With Express, add: app.use(express.raw({ type: 'application/json' }))
// or use express.json() with { verify: (req, res, buf) => { req.rawBody = buf; } }

function verifySignature(rawBody, signature) {
  const expected = crypto
    .createHmac('sha256', SECRET)
    .update(rawBody)
    .digest('hex');
  return crypto.timingSafeEqual(
    Buffer.from(signature),
    Buffer.from(expected)
  );
}

// In your endpoint handler:
const sig = req.headers['x-autoseo-signature'];
if (!verifySignature(req.rawBody, sig)) {
  return res.status(401).send('Invalid signature');
}
Quick Setup with AI
Copy this prompt into Cursor, Claude Code, or any AI coding assistant to generate a ready-to-use webhook endpoint for your project.
Create a webhook endpoint in my project that receives article data from AutoSEO (https://getautoseo.com).

CRITICAL: Do NOT drop, delete, alter, or modify any existing database tables, columns, data, or RLS policies. Only CREATE new tables and functions. Never use DROP TABLE, TRUNCATE, or DELETE on existing tables. This project has existing data that must be preserved. Use CREATE TABLE IF NOT EXISTS for any new tables.

## What the endpoint must do:

1. Accept POST requests with a JSON body
2. Verify the Authorization header contains this exact Bearer token: `aseo_wh_2e5a43307f68fb094354b92455aff530` — reject with HTTP 401 if missing or wrong
3. Optionally also verify the HMAC-SHA256 signature (sent in `X-AutoSEO-Signature` header, computed from the raw JSON request body string using the same token as the HMAC secret — use the raw body bytes, not a re-serialized version)
4. Create a new blog post in my CMS/database using the article data
5. Return HTTP 200 with a JSON response containing the published URL: `{"url": "https://mysite.com/blog/the-slug"}`

## Incoming request format:

Headers:
- Content-Type: application/json
- Authorization: Bearer aseo_wh_2e5a43307f68fb094354b92455aff530
- X-AutoSEO-Signature: <hmac-sha256-hex-digest>
- X-AutoSEO-Event: article.published
- X-AutoSEO-Delivery: <uuid>

JSON body fields:
- event (string): "article.published" or "test"
- id (integer): Unique article ID from AutoSEO
- title (string): Article title
- slug (string): URL-friendly slug
- metaDescription (string): SEO meta description
- content_html (string): Full article as HTML — use this for rendering
- content_markdown (string): Full article as Markdown — use this for storage if your CMS prefers markdown
- heroImageUrl (string|null): Featured hero image URL (fully qualified)
- heroImageAlt (string|null): Alt text for the hero image (use for img alt attribute)
- infographicImageUrl (string|null): Infographic image URL (fully qualified)
- keywords (array): Target keywords, e.g. ["seo strategies"]
- metaKeywords (string|null): Comma-separated SEO keywords
- faqSchema (array|null): FAQ structured data as [{question, answer}] pairs
- languageCode (string): ISO language code, e.g. "en", "es", "de"
- status (string): Always "published"
- publishedAt (string): ISO 8601 timestamp
- updatedAt (string): ISO 8601 timestamp
- createdAt (string): ISO 8601 timestamp

## Requirements:

- If event is "test", just return 200 with `{"url": "https://mysite.com/test"}` — don't create a post
- Download the heroImageUrl and infographicImageUrl and store them locally (don't hotlink)
- Store the AutoSEO article `id` so duplicate deliveries update instead of creating duplicates
- The response MUST include `{"url": "https://..."}` with the full public URL of the published post
- Handle errors gracefully — return 500 if something goes wrong so AutoSEO retries the delivery
Common Questions
When are webhooks sent?
Whenever an article is published, updated, or its hero image finishes generating. Your endpoint receives the complete, ready-to-publish article.
What should my endpoint return?
Return HTTP 200 to acknowledge receipt. If possible, include {"url": "https://..."} in your JSON response so we can link to the live article. Any non-2xx response triggers up to 3 automatic retries (1 min, 5 min, 15 min).
Can I use this with Zapier, Make, or n8n?
Yes. Create a "Webhook" trigger in any of those tools, copy the URL they give you, and paste it here. You'll receive the full article data in your automation flow.
Is my bearer token stored securely?
Yes. We auto-generate a unique token for your site and store it securely. The same token is embedded in your Lovable prompt and AI setup prompts so everything matches without manual copying.
What happens if my endpoint is temporarily down?
We retry failed deliveries up to 3 times with increasing delays. If all retries fail, the webhook is skipped for that article. Your endpoint should be reliable or queue-backed.
Can I use this with serverless functions?
Absolutely. Webhooks work with AWS Lambda, Vercel Functions, Cloudflare Workers, Netlify Functions, and any platform that can receive POST requests.
Lovable Blog Integration
Add a full blog to your Lovable site with a single prompt. Articles publish automatically.
How it works
Paste the prompt below into Lovable. It creates your blog, a Supabase Edge Function endpoint, and a sitemap — with authentication built in. Then paste the Edge Function URL below and hit Connect. Articles publish to your site instantly — no syncing, no polling.
Add a blog to my website. Articles are delivered via webhook from AutoSEO (https://getautoseo.com) and stored in Supabase.

CRITICAL: Do NOT drop, delete, alter, or modify any existing database tables, columns, data, or RLS policies. Only CREATE new tables and functions. Never use DROP TABLE, TRUNCATE, or DELETE on existing tables. This project has existing data that must be preserved.

REQUIREMENTS:

1. SUPABASE DATABASE TABLE
   - Create a "blog_posts" table ONLY IF IT DOES NOT ALREADY EXIST (use CREATE TABLE IF NOT EXISTS)
   - Table columns:
     * id (integer, primary key) — the article id from AutoSEO
     * title (text, not null)
     * slug (text, not null, unique)
     * content_html (text) — the full article HTML, ready to render
     * content_markdown (text) — the article in Markdown format
     * hero_image_url (text) — hero/featured image URL
     * hero_image_alt (text) — alt text for hero image (for accessibility and SEO)
     * infographic_url (text) — infographic image URL (may be null)
     * meta_description (text) — SEO meta description
     * meta_keywords (text) — comma-separated SEO keywords
     * tags (text) — comma-separated tags
     * faq_schema (jsonb) — array of {question, answer} objects for FAQ section
     * language (text, default 'en')
     * reading_time (integer) — estimated minutes to read
     * published_at (timestamptz)
     * updated_at (timestamptz)
     * created_at (timestamptz)
     * received_at (timestamptz, default now()) — when the webhook was received
   - Enable Row Level Security (RLS) on the table
   - Add an RLS policy allowing anonymous SELECT access — the blog is public
   - Add an RLS policy allowing the service_role to INSERT, UPDATE, and DELETE
   - Create an index on slug for fast lookups
   - Create an index on published_at for sorting

2. WEBHOOK RECEIVER EDGE FUNCTION
   - Create a Supabase Edge Function named "receive-article" that:
     a. Accepts POST requests with JSON body
     b. Verifies the Authorization header: extract the Bearer token and compare it to this exact value: "aseo_wh_2e5a43307f68fb094354b92455aff530". If the token doesn't match or is missing, return HTTP 401 with { "error": "Unauthorized" }
     c. Reads the JSON body with these fields:
        - event (string): "article.published" or "test"
        - id (integer): unique article ID
        - title (string): article title
        - slug (string): URL-friendly slug
        - metaDescription (string): SEO meta description
        - content_html (string): full article as HTML
        - content_markdown (string): full article as Markdown
        - heroImageUrl (string|null): featured hero image URL
        - heroImageAlt (string|null): alt text for the hero image (use for img alt attribute)
        - infographicImageUrl (string|null): infographic image URL
        - keywords (array): target keywords
        - metaKeywords (string|null): comma-separated SEO keywords
        - wordpressTags (string|null): comma-separated tags
        - faqSchema (array|null): array of {question, answer} objects
        - languageCode (string): ISO language code (e.g. "en")
        - status (string): "published"
        - publishedAt (string): ISO 8601 timestamp
        - updatedAt (string): ISO 8601 timestamp
        - createdAt (string): ISO 8601 timestamp
     d. If event is "test": return HTTP 200 with { "url": "https://YOUR_DOMAIN/blog/test", "status": "ok" }
     e. Calculate reading_time: strip HTML tags from content_html, count words, divide by 200, round up
     f. UPSERT the article into blog_posts (on conflict on id, update all fields + set received_at = now())
     g. Return HTTP 200 with JSON: { "url": "https://YOUR_DOMAIN/blog/SLUG" }
        IMPORTANT: Replace YOUR_DOMAIN with your actual deployed site domain. AutoSEO reads the "url" field from the response to track where the article was published. This enables the "View Live" link in your AutoSEO dashboard.
     h. On error, return HTTP 500 with { "error": "message" } — AutoSEO will retry up to 3 times
   - The function must use the Supabase service_role key to bypass RLS for writes
   - Set CORS headers to allow POST from any origin (AutoSEO's server sends webhooks)

3. BLOG LISTING PAGE at /blog
   - Query blog_posts from Supabase, ordered by published_at DESC
   - Display each article as a card: hero image (with fallback — hide container if no image or image fails to load), title, meta_description (truncated to ~160 chars), published date (formatted as "Month Day, Year"), reading time
   - Link each card to /blog/[slug]
   - Paginate: show 12 articles initially with a "Load More" button (use Supabase range queries)
   - LOADING STATE: show skeleton card placeholders (3-6 cards) with pulsing animation
   - EMPTY STATE: show "Articles are on the way! Check back soon." with a friendly illustration
   - ERROR STATE: if Supabase query fails, show "Couldn't load articles. Please try again." with a Retry button

4. INDIVIDUAL BLOG POST PAGE at /blog/[slug]
   - Query blog_posts WHERE slug = [slug], single row
   - ARTICLE NOT FOUND: styled 404 with link back to /blog
   - Hero image: responsive container (max-height: 400px, object-fit: cover, full width). Use hero_image_alt as the img alt attribute. On load error, hide the image container — no broken image icons
   - Infographic: if infographic_url is set, display below the article content as a full-width image with a subtle border and rounded corners. On load error, hide it
   - Title: render as h1
   - Meta info row: formatted published date, reading time (e.g. "5 min read")
   - Content: render content_html using dangerouslySetInnerHTML inside a "prose" styled container with these typography rules:
     * h2: 1.5rem, bold, margin-top 1.75rem
     * h3: 1.25rem, bold, margin-top 1.5rem
     * p: 1.1rem line-height, margin-bottom 1rem, color slightly muted (gray-800)
     * ul/ol: proper indentation, visible bullets/numbers, margin-bottom 1rem, li margin-bottom 0.5rem
     * blockquote: left border (4px, primary color), italic, padding-left 1rem, muted text
     * code (inline): background gray-100, padding 2px 6px, rounded, monospace font
     * pre > code: background gray-900, text gray-100, padding 1rem, rounded-lg, overflow-x auto
     * table: full width, bordered cells, alternating row backgrounds, horizontal scroll wrapper on mobile
     * img inside content: max-width 100%, height auto, rounded-lg, centered. Add onerror handler to hide broken images
     * a: colored link (primary color or blue-600), underline on hover, target="_blank" rel="noopener noreferrer"
   - FAQ SECTION: if faq_schema exists and is not empty, render below the article content:
     * Heading: "Frequently Asked Questions"
     * Each Q&A as a collapsible accordion (question = clickable header, answer = expandable body)
     * First item expanded by default, rest collapsed
     * Smooth expand/collapse animation
     * Inject FAQPage JSON-LD structured data (schema.org)
   - RELATED ARTICLES: below FAQ (or below content if no FAQs), show up to 3 other recent articles excluding the current one. Display as small horizontal cards (image, title, date)
   - "← Back to all articles" link at the top

5. SEO & META TAGS
   - Blog listing: title "Blog | [Site Name]", meta description "Read our latest articles and insights"
   - Article page: title "[Article Title] | [Site Name]"
   - Per-article meta tags (react-helmet-async or equivalent):
     * meta description from meta_description column (fall back to first 160 chars of content)
     * meta keywords from meta_keywords column
     * og:title, og:description, og:image (hero_image_url), og:type="article"
     * og:url = https://[your-domain]/blog/[slug]
     * twitter:card="summary_large_image", twitter:title, twitter:description, twitter:image
     * canonical link: https://[your-domain]/blog/[slug]
   - Article JSON-LD (schema.org Article): headline, image, datePublished, dateModified, description, publisher
   - FAQPage JSON-LD if faq_schema exists

6. SITEMAP at /sitemap.xml
   - Create a Supabase Edge Function that reads from blog_posts and returns valid XML sitemap
   - Configure a rewrite so /sitemap.xml hits this Edge Function
   - List every blog post as https://[your-domain]/blog/[slug]
   - Include lastmod from updated_at, changefreq "weekly", priority "0.7"
   - Include /blog listing with priority "0.8"
   - Include homepage with priority "1.0"

7. SPA ROUTING & DEPLOYMENT
   - Ensure /blog and /blog/[slug] routes work with direct navigation
   - Add redirect/rewrite config: public/_redirects for Netlify or vercel.json for Vercel

8. NAVIGATION
   - Add a "Blog" link to the main navigation linking to /blog
   - Highlight the Blog nav item when on /blog/*

9. DESIGN & RESPONSIVENESS
   - Clean, modern layout matching my existing site style
   - Blog listing: responsive grid — 1 col mobile, 2 tablet, 3 desktop
   - Article cards: subtle hover effect (lift + shadow), smooth transitions, rounded image corners
   - Article page: max-width 720px centered for comfortable reading
   - Fully responsive, mobile-first
   - All images responsive with max-width: 100%
   - All interactive elements have cursor: pointer
Setup steps
Click Copy Prompt above and paste it into Lovable
Lovable builds your blog pages, Supabase table, webhook endpoint, and sitemap
Copy the Edge Function URL from Supabase (it looks like https://xxx.supabase.co/functions/v1/receive-article)
Paste the URL below, hit Send Test to verify, then Connect
The Supabase Edge Function URL that Lovable created for you.
Already embedded in the Lovable prompt above — no need to change this.
Published URL tracking: The Edge Function returns the live URL for each article. AutoSEO uses this to show "View Live" links in your dashboard and enable backlink exchange. The prompt also creates /sitemap.xml for search engine discovery.
Enable your feed first
The Lovable prompt needs your JSON feed URL. Enable your feed to get started.
What you get
AI-Generated Blog
Lovable builds your blog pages, routing, and design from a single prompt
Auto-Sitemap
Dynamic /sitemap.xml so search engines find every article
Backlink Ready
Standard /blog/slug URLs let us verify posts and enable backlink exchange