Connect Website
Connect REaktion Eric Sylvester Redlinger to AutoSEO so articles publish automatically.
Which platform is the website built on?
Select the platform so we can connect properly.
What's the WordPress website URL?
We'll verify that WordPress is running on the site.
You can enter with or without https://
WordPress Not Detected
Install the AutoSEO Plugin
Click the button below to open the WordPress plugin page. Install and activate the AutoSEO plugin.
WordPress Detected!
Here's what you'll see:
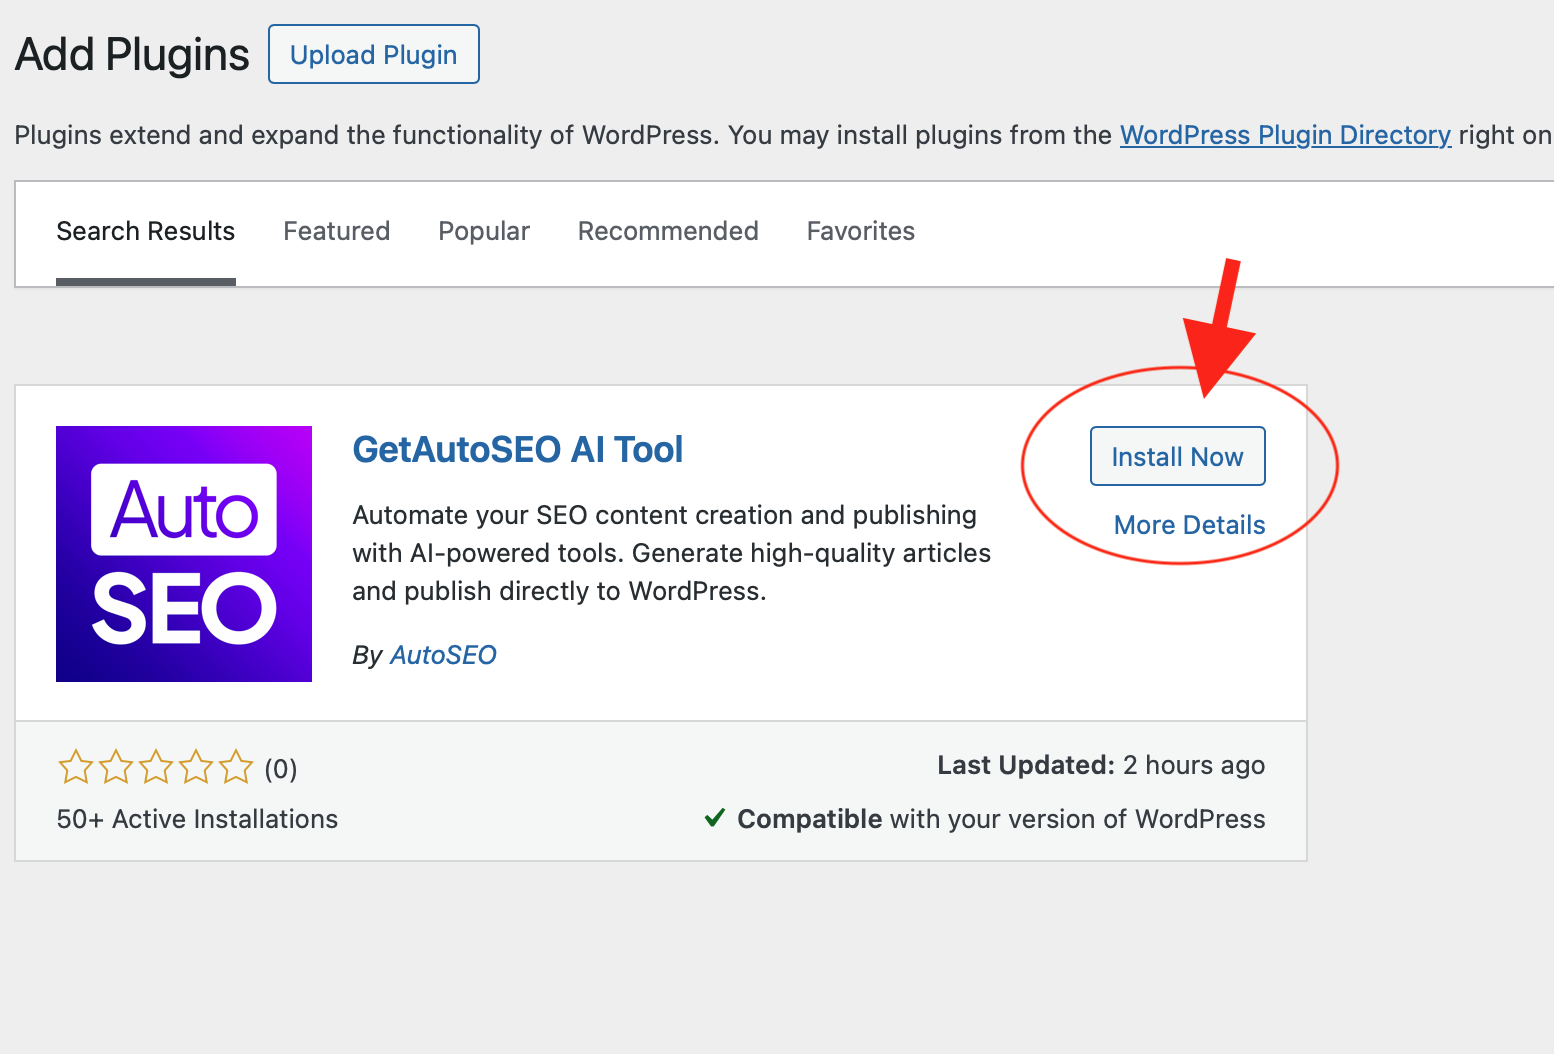
The AutoSEO plugin in your WordPress plugin search results
After clicking the button below:
- 1Find "AutoSEO - AI Content Publisher" in the search results
- 2Click "Install Now" then "Activate"
- 3Come back here for the API key
Connecting to Your WordPress Site...
Verifying the plugin installation automatically.
WordPress Connected!
The plugin is installed and connected. Articles will now publish automatically.
Enter the API Key in WordPress
Copy the API key below and paste it into the AutoSEO plugin settings in WordPress.
Where to paste this key:
- 1. Go to your WordPress admin panel
- 2. Navigate to Settings → AutoSEO
- 3. Paste the API key and click Save
Connect Shopify Store
We need the Shopify admin domain (not the public website URL) to securely connect.
Connect Webflow
Click below to authorize AutoSEO to publish articles to your Webflow site.
Select Webflow Site
Loading sites...
Choose which Webflow site you want to publish articles to:
Select CMS Collection
Loading collections...
Choose which CMS Collection to publish articles to:
Map Fields
Map your article fields to Webflow CMS fields:
Syncing Your Articles
Please wait while we publish your articles to Webflow...
Preparing articles...
All Done!
Your Webflow integration is complete!
Sync Error
Connect Wix
Click below to authorize AutoSEO to publish articles to your Wix blog.
How to Add the Wix Blog App
Your Wix site needs the free Wix Blog app so we can publish articles. It only takes a minute:
-
1
Open your Wix Editor
Log in to Wix and open your site in the Editor.
-
2
Click "Add Apps" in the left sidebar
Look for the app market icon (grid of squares) on the left side.
-
3
Search for "Wix Blog" and click Add
It's free. Click "Add to Site" to install it.
-
4
Publish your Wix site
Click "Publish" in the top right to make the blog live.
-
5
Come back here and click "I've added Wix Blog"
We'll verify the blog app is installed and finish the setup.
Using Wix Studio? Go to Add Elements → Blog, then drag the blog widget onto your page.
Select Your Wix Site
Choose which Wix site you want to publish your articles to.
Loading your Wix sites...
Failed to load sites.
No sites found in your Wix account.
Make sure you have at least one site with a blog in your Wix account.
Connect BigCommerce
Enter your BigCommerce API credentials to connect.
The part after store- in your BigCommerce URL
From a Store-level API account with Content modify access
Get Your Store Hash
Open your BigCommerce admin URL. Copy the part between store- and .mybigcommerce.com.
Example: https://store-mh5fua96uw.mybigcommerce.com/... → Store Hash: mh5fua96uw
Open API Accounts
In BigCommerce, go to Settings (left sidebar) → scroll to API → click Store-level API accounts.
Create API Account
Click Create API account (top right). Select V2/V3 API token. Name it "AutoSEO".
Set Content Permission
Under Content, choose modify access. This allows AutoSEO to create and update blog posts.
Save & Copy the Access Token
Click Save. Copy the Access Token immediately — BigCommerce only shows it once.
Paste & Connect
Enter your Store Hash and Access Token in the fields above, then click Connect BigCommerce.
Connect Duda
Enter your Duda site name and Partner API credentials.
Connect HubSpot
Paste a HubSpot Private App token with Content access.
Create it in HubSpot under Development → Legacy Apps. Add the Content scope.
Connect GoHighLevel
Paste a Private Integration token and Location ID.
Find it in Settings → Business Profile.
Connect Squarespace
Use a unique Squarespace password created only for AutoSEO.
Turn off 2FA/login verification before connecting, or automatic publishing may fail.
Connect Framer
Install the AutoSEO plugin in Framer and paste this API key.
- 1. Open your Framer project.
- 2. Go to Plugins and search for AutoSEO.
- 3. Create a CMS collection and use AutoSEO as the data source.
- 4. Paste the API key above and sync your articles.
Set Up Hosted Blog
Point a subdomain to AutoSEO and we host the blog for you.
Add this DNS record:
Type: CNAME
Name:
Target: blogs.getautoseo.com
Enable RSS/JSON Feeds
Use feeds for static sites, readers, custom builds, and Lovable.
Connect Webhook
Send each article to your own API endpoint.
Connect Lovable
Lovable uses a JSON feed to display your articles. Copy the prompt below and paste it into Lovable to add a blog.
The RSS feed needs to be enabled first. Choose RSS/Feeds on this page, enable the feed, then come back to Lovable.
Need help? Email us at [email protected]